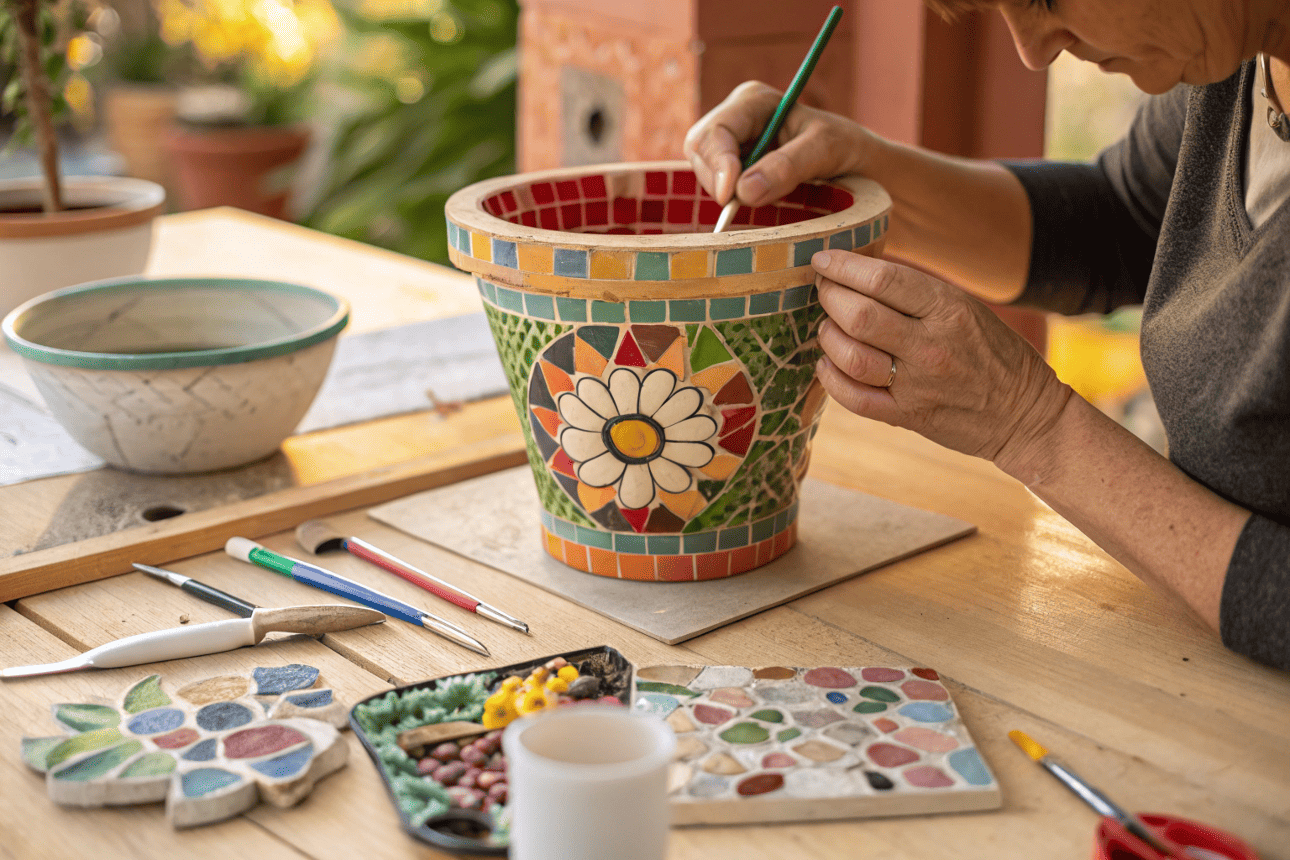
How do you mosaic a pot? How do you mosaic a backsplash? How do you tile a mosaic a “anything”?
Ever wondered how to mosaic a flower pot, a backsplash, or even a wooden board? Whether you’re embellishing everyday items or creating decorative art, mosaics are easier than they look — and surprisingly inexpensive.
This tutorial will walk you through the steps to create your own mosaic using broken tiles or dishes. It’s fun, creative, and totally customizable.
Essential Materials and Tools for Creating Beautiful Mosaics
Building a beautiful mosaic requires careful selection of materials and tools. Through years of experience, I’ve identified essential items that make the difference between amateur and professional results. Quality tools not only improve your finished piece but also make the creative process more enjoyable and efficient.
Essential Tools:
- Glass nippers for precise cutting
- Mosaic hammer for breaking larger pieces
- Safety glasses and protective gloves
- Tweezers for placing small tesserae
- Sponges and cleaning cloths
- Mixing containers for adhesive and grout
Nice-to-Have Items:
- Glass scoring tools for curved cuts
- Wet saw for complex shapes
- Tile spacers for consistent gaps
- Protective knee pads for floor work
My tool collection has evolved significantly since I started. Initially, basic household tools sufficed, but investing in quality nippers and proper safety equipment transformed both my technique and results. Budget-conscious beginners can start with essential tools and gradually add specialized equipment as their skills develop.
Choosing Your Base: Surfaces That Work Well for Mosaics
The foundation of any successful mosaic depends on selecting an appropriate base material. Different surfaces work well for different applications, each offering unique advantages and challenges. Understanding these characteristics prevents project failures and ensures long-lasting results.
Wood bases provide excellent workability for indoor projects but require proper sealing to prevent moisture damage. I prefer marine-grade plywood for outdoor applications and standard plywood for interior pieces. Concrete surfaces offer superior durability for outdoor installations but demand specialized adhesives and longer curing times.
Mesh backing enables the indirect method, allowing complex designs to be assembled separately before installation. This technique proves invaluable for large-scale projects or installations in challenging locations. Metal surfaces require careful preparation and compatible adhesives but create stunning contemporary pieces when properly executed.
Selecting Tesserae: Traditional and Creative Material Options
Traditional mosaic materials include glass, ceramic tiles, and natural stone, each bringing distinct characteristics to your artwork. Glass tesserae create brilliant, light-catching surfaces with unmatched color saturation. Ceramic tiles offer durability and consistent thickness, making them ideal for functional applications like tabletops or floors.
Creative materials expand artistic possibilities beyond conventional boundaries. Broken pieces of china create charming vintage aesthetics, while shells and colorful buttons add texture and personality to designs. Beach glass, vintage jewelry, and mirror fragments transform ordinary surfaces into captivating focal points.
I’ve discovered remarkable results using unconventional materials. Old CDs create prismatic effects, while broken pottery adds rustic charm to garden installations. The key is ensuring all materials can withstand your project’s intended environment and use.
Safety considerations become paramount when working with sharp materials. Always wear protective eyewear and gloves, especially when breaking glass or ceramic pieces. Proper disposal of sharp fragments protects both you and others who might encounter waste materials.
Finding and Sourcing Alternative Mosaic Materials
Thrift stores, estate sales, and flea markets provide treasure troves of potential mosaic materials. Damaged glassware, chipped plates, and outdated decorative items often cost pennies while offering unique colors and textures unavailable in commercial supplies. I regularly visit these venues, keeping an eye out for interesting glass bottles, vintage tiles, and unusual ceramic pieces.
Recycling centers sometimes allow material recovery, particularly glass bottles in various colors. Beach combing yields naturally tumbled glass with smooth edges and weathered patinas. Construction sites occasionally have tile remnants available with permission, providing high-quality materials at no cost.
Building relationships with local contractors, tile installers, and stained glass artists creates reliable sources for quality materials. Many professionals discard perfectly usable scraps that become treasures for mosaic artists. Networking within the artistic community often leads to material exchanges and collaborative opportunities.
Making Your Own Tesserae from Recycled Materials
Creating homemade tesserae from recycled glass bottles and ceramic items adds personal meaning to your artwork while supporting environmental sustainability. The process requires patience and proper safety equipment but yields unique materials impossible to purchase commercially.
Glass Breaking Technique:
- Score glass using a quality glass cutter
- Break along score lines using running pliers
- Shape pieces using glass nippers
- Smooth sharp edges using sandpaper or tumbling
Safety Precautions:
- Always wear safety glasses and cut-resistant gloves
- Work over a contained area to catch fragments
- Dispose of sharp waste responsibly
- Keep first aid supplies readily available
I’ve developed a DIY tumbling method using a sealed container, coarse sand, and gentle agitation over several days. This process mimics natural beach glass formation, creating smooth edges safe for handling. The tumbling also adds character through subtle surface texturing that catches light beautifully.
Adhesives and Grout: Making the Right Choice for Your Project
Selecting appropriate adhesives and grout determines your mosaic’s longevity and appearance. Indoor projects typically use mastic or liquid adhesives, while outdoor installations require waterproof thinset mortar. Cement-based adhesives provide superior strength but demand more complex mixing and application.
Grout Selection Considerations:
- Sanded grout for gaps wider than 1/8 inch
- Unsanded grout for tight spacing
- Epoxy grout for wet areas and outdoor applications
- Color matching or contrasting based on design intent
My experience has taught me that excess grout removal requires immediate attention. Waiting too long makes cleaning exponentially more difficult and can permanently stain certain tesserae materials. Professional-grade sponges and clean water facilitate proper grout cleanup without disturbing freshly placed materials.
Step-by-Step Guide to Creating Your First Mosaic
Creating your first mosaic follows a systematic process that builds confidence through manageable steps. This approach, refined through years of teaching and personal practice, ensures successful results while developing fundamental skills. Each phase builds upon previous steps, creating a logical progression from concept to completion.
Main Process Steps:
- Design development and transfer
- Surface preparation
- Material preparation and cutting
- Tesserae placement
- Grouting and finishing
- Sealing and protection
Planning Your Design: From Concept to Pattern
Successful mosaics begin with thoughtful design planning. Start by sketching your concept onto a piece of paper, considering how the design will translate into small pieces. Simple, bold patterns work better than intricate details for beginners. Transfer your design onto a piece of substrate using carbon paper or direct drawing.
Consider the natural flow of tesserae placement during design development. Curved lines require careful planning to maintain smooth transitions, while geometric patterns offer more forgiving placement options. I often create full-scale paper templates for complex designs, allowing experimentation before committing to permanent materials.
Color planning becomes crucial during this phase. Create a color palette using actual tesserae samples rather than relying on drawings alone. Lighting conditions significantly affect color perception, so evaluate your materials under similar conditions to the final installation location.
Preparing Your Work Surface and Materials
Proper preparation prevents common problems and ensures professional results. Protect your work surface with plastic sheeting or newspaper, allowing easy cleanup of adhesive spills and glass fragments. Organize materials by color and size, keeping frequently used pieces within easy reach.
Pre-cut tesserae to approximate sizes before beginning placement. This preparation maintains creative flow without interrupting the placement process for cutting tasks. Sort pieces by size and color in shallow containers, making selection quick and intuitive during the assembly phase.
Safety Setup:
- Adequate lighting to prevent eye strain
- Comfortable seating and work height
- Easy access to cleaning materials
- Proper ventilation for adhesive fumes
- First aid supplies within reach
Cutting and Arranging Tesserae Safely and Effectively
Effective cutting techniques vary by material type and desired shape. Glass nippers provide the most control for irregular shapes, while tile saws create precise geometric cuts. Practice cutting techniques on scrap materials before working on final pieces, developing muscle memory and confidence.
Arrange cut pieces temporarily before applying adhesive, allowing design adjustments without waste. This dry-fitting process reveals spacing issues and color balance problems before permanent placement. I often photograph arrangements for reference during the adhesion process.
Cutting Safety Protocol:
- Wear safety glasses and gloves consistently
- Cut over a contained area
- Keep cutting tools sharp for clean breaks
- Work at comfortable angles to prevent strain
- Take frequent breaks to maintain concentration
Advanced Glass Breaking and Cutting Techniques
Mastering advanced glass cutting techniques opens creative possibilities unavailable through basic methods. Curved cuts require scoring in multiple stages, following the natural stress patterns within glass. Running pliers apply controlled pressure along score lines, creating clean breaks in predictable directions.
Bottle cutting demands specialized techniques due to curved surfaces and varying glass thickness. Score bottles using jigs or guides to maintain consistent line depth. Temperature differential methods using hot and cold water can create clean breaks around bottle circumferences, though practice is essential for consistent results.
Complex shapes often require multiple cuts and careful planning. Break large pieces into manageable sections before attempting detailed shaping. Glass grinders smooth rough edges and refine shapes that prove difficult to achieve through cutting alone.
Adhesion Techniques: Direct and Indirect Methods
The direct method involves placing tesserae directly onto the final substrate using adhesive. This approach works well for smaller projects and allows real-time design adjustments. Apply adhesive in small sections to prevent premature drying, working systematically across your design area.
The indirect method assembles mosaics face-down on temporary surfaces before transferring to final locations. This technique suits large installations or complex designs requiring precise alignment. Create the mosaic on paper or mesh backing, then flip and install as a complete unit using mortar or adhesive.
My preference depends on project scale and complexity. Small decorative pieces benefit from direct placement, while architectural installations often require indirect methods for quality control and logistical efficiency. Each approach demands different skills and planning considerations.
Grouting Your Mosaic: Tips for a Professional Finish
Proper grouting transforms individual tesserae into unified artwork while providing structural integrity. Mix grout according to manufacturer specifications, achieving a consistency similar to thick peanut butter. Work grout into all gaps using diagonal motions to prevent pulling tesserae from their positions.
Remove excess grout promptly using clean, damp sponges. Rinse sponges frequently in clean water to prevent grout residue from clouding tesserae surfaces. Work systematically across the surface, cleaning small sections thoroughly before moving to adjacent areas.
Grouting Process:
- Mix grout to proper consistency
- Apply using diagonal sweeping motions
- Fill all gaps completely
- Remove excess grout with damp sponge
- Wipe final haze with clean cloth
- Allow proper curing time before sealing
The final cleaning phase determines your mosaic’s professional appearance. Use clean water and frequent sponge rinsing to achieve clear, bright tesserae surfaces. Some materials require special cleaning considerations – natural stone may need pH-neutral cleaners, while glass tolerates standard methods.
Sealing and Protecting Your Finished Piece
Proper sealing extends your mosaic’s lifespan and maintains its appearance. Indoor pieces require minimal protection, while outdoor installations need comprehensive weatherproofing. Choose sealers compatible with both your tesserae materials and grout type to prevent adverse reactions.
Apply sealers in thin, even coats using appropriate applicators. Multiple light coats provide better protection than single heavy applications. Allow complete curing between coats, following manufacturer timing recommendations precisely for optimal protection.
Advanced Techniques for Mosaic Artists
Advanced mosaic techniques build upon fundamental skills while introducing creative challenges that push artistic boundaries. These methods require patience and practice but yield distinctive results unavailable through basic approaches. Mastering advanced techniques opens opportunities for complex commissions and personal artistic growth.
Dimensional work, complex color gradations, and mixed-media integration characterize advanced mosaic art. These techniques demand refined material handling skills and sophisticated design sensibilities developed through extensive practice and experimentation.
Creating Outdoor Mosaics That Withstand the Elements
Outdoor mosaics face environmental challenges requiring specialized materials and techniques. Freeze-thaw cycles, UV exposure, and moisture infiltration threaten poorly constructed installations. I’ve learned through experience that outdoor success depends on meticulous attention to material compatibility and installation details.
Weather-resistant materials become essential for outdoor applications. Vitreous glass tesserae resist fading and moisture absorption better than ceramic alternatives. Natural stone provides durability but requires careful selection to avoid materials prone to spalling or staining. Synthetic materials offer consistent performance but may lack the character of natural alternatives.
Outdoor-Suitable Materials:
- Vitreous glass mosaic tiles
- Natural stone (granite, slate, marble)
- Porcelain tiles rated for exterior use
- Recycled glass products designed for outdoor use
- Properly treated ceramic materials
Concrete substrates provide ideal foundations for outdoor mosaics when properly prepared and reinforced. Steel mesh reinforcement prevents cracking from ground movement, while proper drainage design prevents water accumulation behind installations.
Waterproofing and Sealing for Outdoor Mosaics
Comprehensive waterproofing protects outdoor mosaics from moisture damage and freeze-thaw destruction. Begin with proper substrate preparation, ensuring positive drainage and stable foundations. Apply waterproof membranes before installing mosaics, creating barriers against moisture infiltration from behind.
Epoxy-based sealers provide superior weather protection compared to standard acrylic products. These industrial-grade sealers resist UV damage, temperature extremes, and chemical exposure from cleaning products or environmental pollutants. Reapplication schedules depend on exposure conditions but typically range from three to five years.
Waterproofing Process:
- Prepare substrate with proper slope for drainage
- Apply waterproof membrane according to specifications
- Install mosaic using exterior-grade adhesive
- Grout with weatherproof materials
- Apply appropriate sealer system
- Establish maintenance schedule for long-term protection
Regular inspection and maintenance preserve outdoor installations indefinitely. Address minor issues promptly before they develop into major problems requiring extensive repair or replacement.
Three-Dimensional and Sculptural Mosaics
Three-dimensional mosaic work requires advanced planning and specialized techniques. Unlike flat installations, sculptural pieces must consider viewing angles, structural integrity, and material behavior on curved surfaces. I approach 3D projects by first creating detailed mockups to work out technical challenges before beginning final construction.
Curved surfaces present unique tesserae placement challenges. Materials must conform to surface contours while maintaining consistent gaps for grouting. Smaller tesserae generally work better on tight curves, while larger pieces suit gentle contours. Flexible substrates sometimes facilitate complex shapes but require careful structural support.
3D Considerations:
- Structural support for weight distribution
- Tesserae size appropriate for surface curvature
- Access for grouting and cleaning all surfaces
- Viewing angles and lighting effects
- Weather protection for outdoor installations
Sculptural mosaics often combine multiple techniques and materials within single pieces. Mixed media integration requires careful planning to ensure compatibility and longevity. Document successful combinations for future reference and continued artistic development.
Creating Mosaic Projects for Different Spaces
Adapting mosaic techniques to specific environments requires understanding how location affects material selection, installation methods, and maintenance requirements. Each application presents unique challenges and opportunities that influence design decisions and technical approaches.
Successful space-specific mosaics balance aesthetic goals with practical requirements. Kitchen installations need different materials than garden features, while wall treatments differ significantly from floor applications in both technique and material selection.
Creating Floor Mosaics: Specialized Techniques
Floor mosaics demand exceptional durability and safety considerations unavailable in wall applications. Foot traffic, cleaning chemicals, and potential slip hazards require careful material selection and installation techniques. I’ve learned that floor success depends more on technical execution than artistic vision, though both remain important.
Floor-Specific Requirements:
- Slip-resistant surface textures
- Materials rated for floor applications
- Smooth transitions to prevent tripping
- Proper substrate preparation for load distribution
- Professional-grade adhesives and grout
Tesserae selection becomes critical for floor applications. Materials must resist wear, staining, and impact damage while maintaining attractive appearance over years of use. Natural stone provides excellent durability but requires sealing against stains. Glass tiles offer easy maintenance but may become slippery when wet.
Installation techniques for floors differ significantly from wall methods. Proper substrate preparation includes level checking, moisture barriers, and reinforcement appropriate for expected loads. Professional installation often proves cost-effective for complex floor projects due to specialized requirements and consequences of failure.
The Historical Context of Mosaic Art
Understanding mosaic history enriches contemporary practice by connecting modern artists with ancient traditions. The Greeks and Romans developed many techniques still used today, while Byzantine craftsmen elevated mosaic art to unprecedented sophistication. Spanish artist Antoni Gaudi created revolutionary architectural mosaics in Barcelona that continue inspiring contemporary artists worldwide.
Ancient mosaics from Pompeii and other archaeological sites demonstrate the medium’s remarkable durability. These historical examples prove that properly executed mosaics can survive millennia with minimal maintenance. Modern practitioners study these ancient works to understand both technical methods and artistic approaches that have proven successful over time.
Historical Development:
- Mesopotamian pebble mosaics (8th century BCE)
- Greek geometric patterns and figurative scenes
- Roman technical innovations and widespread adoption
- Byzantine religious and imperial commissions
- Islamic geometric and calligraphic traditions
- Renaissance revival and technical refinement
- Modern artistic interpretation and innovation
Contemporary mosaic art benefits from both traditional knowledge and modern materials. Today’s artists combine ancient wisdom with contemporary tools, creating works that honor historical traditions while expressing current artistic visions.
The Longevity of Mosaics: Why This Art Form Endures
Mosaic durability extends beyond physical preservation to cultural and artistic relevance. The medium’s inherent characteristics – permanent materials, weather resistance, and light-reflecting properties – ensure that well-constructed mosaics remain beautiful for generations. This longevity creates lasting value unavailable in more ephemeral art forms.
The collaborative nature of mosaic creation also contributes to its enduring appeal. Large installations often involve multiple artisans working together, creating community connections and shared ownership in finished works. This social aspect appears throughout mosaic history, from ancient workshops to contemporary community art projects.
I create my own pieces with longevity in mind, using proven materials and time-tested techniques while incorporating personal artistic vision. Each mosaic represents an investment in permanent beauty that will outlast its creator, contributing to the medium’s continuing tradition of excellence.
Troubleshooting Common Mosaic Problems
Even experienced artists encounter challenges during mosaic creation. Understanding common problems and their solutions prevents frustration and material waste. Most issues result from inadequate preparation, incompatible materials, or rushing through critical steps.
Common Problems and Solutions:
- Tesserae falling off: Usually indicates inadequate substrate preparation or incompatible adhesive. Clean affected areas and re-adhere using appropriate materials.
- Grout cracking: Often results from mixing errors or rapid drying. Remove damaged grout and reapply with proper consistency and curing conditions.
- Color bleeding: Some materials leach dyes into grout. Test suspicious materials separately and seal if necessary before grouting.
- Uneven surfaces: Poor substrate preparation or inconsistent tesserae thickness. Level substrates properly and sort materials by thickness before installation.
Prevention remains more effective than correction for most mosaic problems. Invest time in proper preparation, material testing, and technique development to avoid issues that compromise finished quality. Document successful approaches for future reference and continuous improvement.
Conclusion: Embracing the Journey of Mosaic Creation
Mosaic creation offers unique rewards combining technical skill development with unlimited creative expression. Each project teaches new lessons while building confidence and capability for increasingly ambitious work. The craft demands patience and persistence but rewards dedication with beautiful, permanent artwork that enriches both creator and viewer.
Begin with simple projects to develop fundamental skills before attempting complex installations. Every mosaic contributes to your artistic growth and technical understanding. Embrace both successes and failures as learning opportunities that advance your masaic journey toward mastery and personal artistic fulfillment.
FAQ
How long do mosaics last?
Properly constructed mosaics can last centuries. Ancient examples from Pompeii remain intact after nearly 2,000 years. Modern mosaics using quality materials and techniques typically last 50-100+ years with minimal maintenance.
What’s the difference between indoor and outdoor mosaics?
Outdoor mosaics require weather-resistant materials, waterproof adhesives and grout, proper drainage, and UV-resistant sealers. Indoor pieces can use standard materials with basic protection.
How do you make mosaic art in steps?
- Design and transfer pattern
- Prepare workspace and materials
- Cut and arrange tesserae
- Apply adhesive and place pieces
- Grout and clean excess
- Seal for protection
What is mosaic technique for beginners?
Beginners should start with the direct method: design transfer, material preparation, tesserae placement with adhesive, grouting, and sealing. Focus on simple patterns and quality materials.
What materials are needed for mosaics?
Essential materials include tesserae (glass, ceramic, or stone pieces), adhesive, grout, and basic tools like nippers and sponges. Safety equipment including glasses and gloves is also crucial.