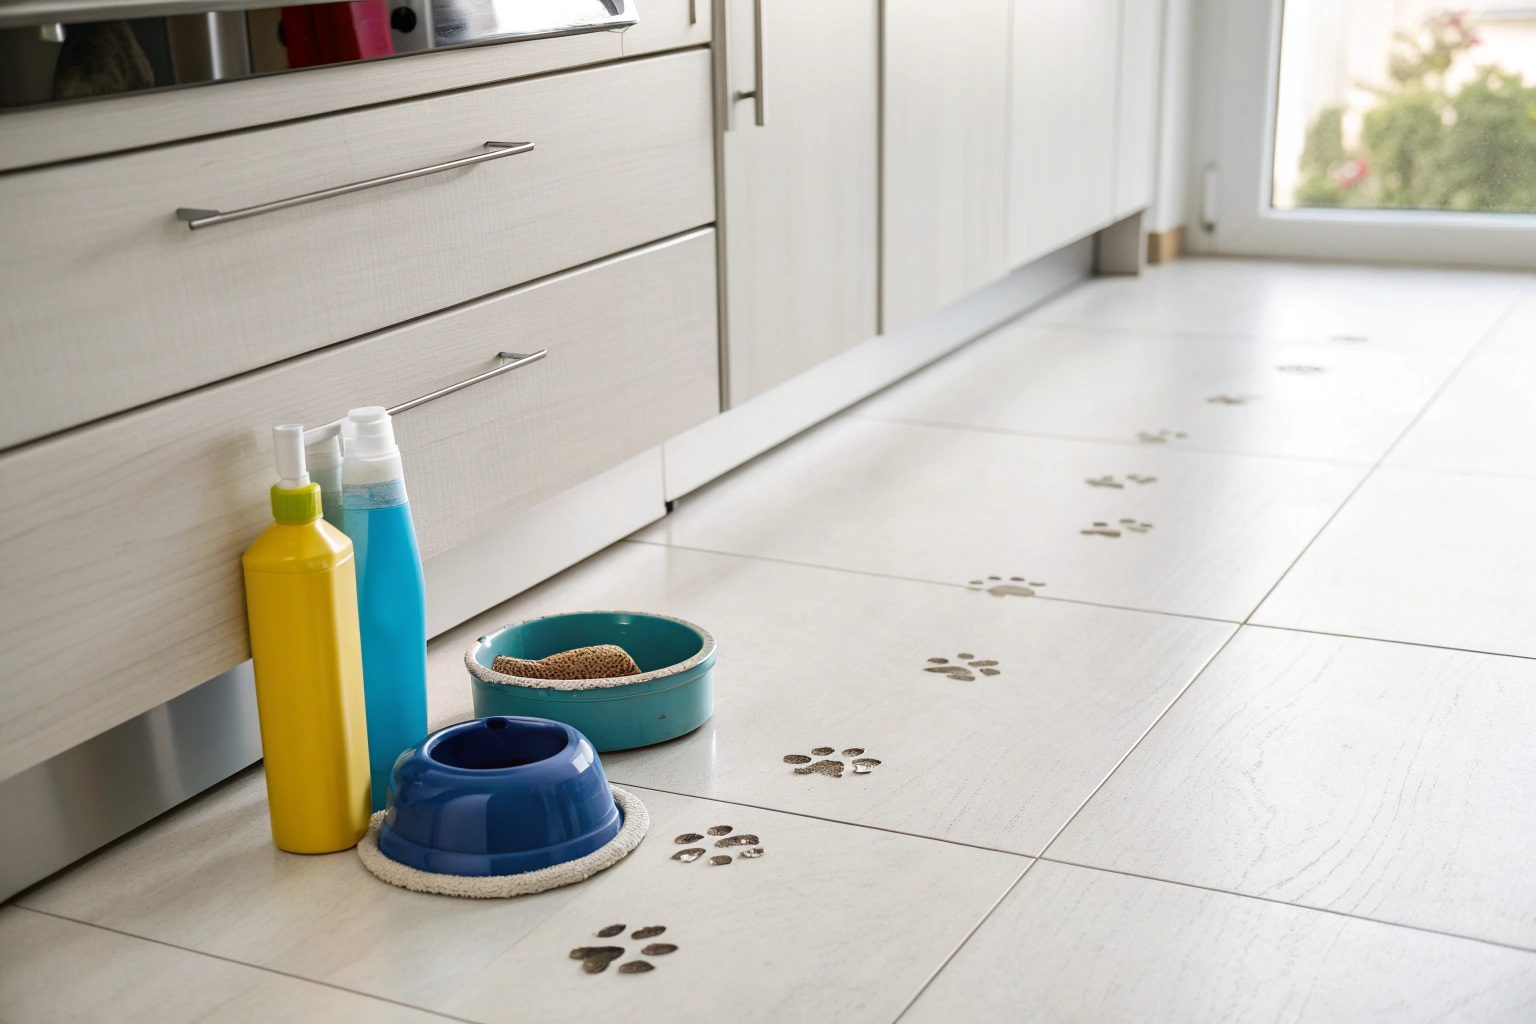
A diy pet safe floor cleaner is a homemade cleaning solution using simple, non-toxic household ingredients to clean floors without endangering your pets. Commercial cleaners can contain chemicals that are harmful if pets lick their paws or lie on treated surfaces. Creating your own cleaner gives you full control over the ingredients, addressing common concerns about pet safety and exposure to harsh residues. This approach provides peace of mind while effectively maintaining a clean home environment.
Key Benefits at a Glance
- Protects Pet Health: Eliminates exposure to toxic chemicals like ammonia and bleach, preventing skin irritation, respiratory issues, and accidental poisoning.
- Saves Money: Costs just pennies to make using affordable, multi-purpose pantry staples like white vinegar and water instead of expensive specialty products.
- Simple & Effective: A basic vinegar and water mixture is powerful enough to disinfect and cut through grease and grime on most sealed hard floors.
- Quick to Prepare: You can mix a fresh batch in less than a minute using a spray bottle or bucket, making it a convenient solution for daily cleanups.
- Eco-Friendly Formula: Reduces plastic waste from commercial packaging and uses biodegradable ingredients that are safe for your family and the environment.
Purpose of this guide
This guide is designed for pet owners who want to switch from commercial products to a safer, homemade floor cleaning solution. It solves the common problem of finding a floor cleaner that is genuinely non-toxic for dogs, cats, and other curious pets who have close contact with floors. Here, you will find simple, step-by-step recipes for an effective diy pet safe floor cleaner, learn which common ingredients (like certain essential oils) to avoid, and gain the confidence to keep your home spotless without risking your pet’s well-being.
The Hidden Dangers in Commercial Floor Cleaners
Walking into any grocery store cleaning aisle reveals an overwhelming array of products promising sparkling clean floors. Yet beneath those gleaming marketing claims lies a troubling reality that many pet owners discover too late: the very products designed to create a “clean” home environment may be silently endangering our beloved companions.
Just as floor cleaners must be pet-safe, so must insect repellents—learn which ones are truly safe in my guide: Is Mosquito Repellent Safe for Dogs?
I learned this lesson the hard way when my golden retriever, Max, began showing signs of respiratory distress after I switched to a new “extra-strength” floor cleaner. His labored breathing and persistent coughing led to an emergency vet visit, where I discovered that many common household cleaning products contain chemicals that are particularly harmful to pets. This wake-up call launched my journey into understanding exactly what lurks in those brightly colored bottles.
| Chemical | Common Sources | Pet Health Effects | Exposure Method |
|---|---|---|---|
| Ammonia | Glass cleaners, floor cleaners | Respiratory distress, throat irritation | Inhalation, skin contact |
| Bleach | Disinfectants, whitening cleaners | Skin burns, breathing problems | Inhalation, paw contact |
| Phenols | Disinfectants, pine cleaners | Liver damage, neurological issues | Paw absorption, ingestion |
| Formaldehyde | Air fresheners, preservatives | Cancer risk, allergic reactions | Inhalation, skin contact |
| Phthalates | Fragranced products | Hormone disruption, reproductive issues | Inhalation, ingestion |
The U.S. Environmental Protection Agency acknowledges that many conventional cleaning products contain ingredients that can harm both human health and the environment. However, pets face unique vulnerabilities that make these dangers even more pronounced. Their smaller body size means toxins affect them more rapidly, while their grooming habits increase the likelihood of ingesting harmful residues left on surfaces.
Ammonia, commonly found in glass and floor cleaners, causes immediate respiratory distress in pets. The chemical irritates mucous membranes and can trigger asthma-like symptoms, particularly dangerous for cats and small dogs. Bleach presents dual threats through both inhalation and direct contact. When pets walk across freshly cleaned surfaces, bleach residue can burn their sensitive paw pads, while inhaling the fumes causes throat and lung irritation.
Perhaps most insidious are phenols, found in many pine-scented cleaners and disinfectants. These compounds are particularly toxic to cats, whose livers cannot efficiently process these chemicals. Even small amounts absorbed through paw pads can accumulate over time, potentially causing liver damage and neurological problems. Formaldehyde, used as a preservative in many cleaning products and air fresheners, is classified as a carcinogen and triggers allergic reactions in sensitive pets.
- Never mix bleach with vinegar or ammonia – creates toxic gas
- Pets absorb chemicals through paw pads faster than humans through skin
- Symptoms may appear hours after exposure
- Even ‘pet-friendly’ commercial products may contain harmful ingredients
The marketing term “pet-friendly” on commercial products often means little more than the absence of the most obviously toxic ingredients. Many products still contain synthetic fragrances, preservatives, and surfactants that can cause skin irritation, respiratory issues, or digestive problems in sensitive animals. Understanding these hidden dangers is the first step toward creating a truly safe environment for our pets.
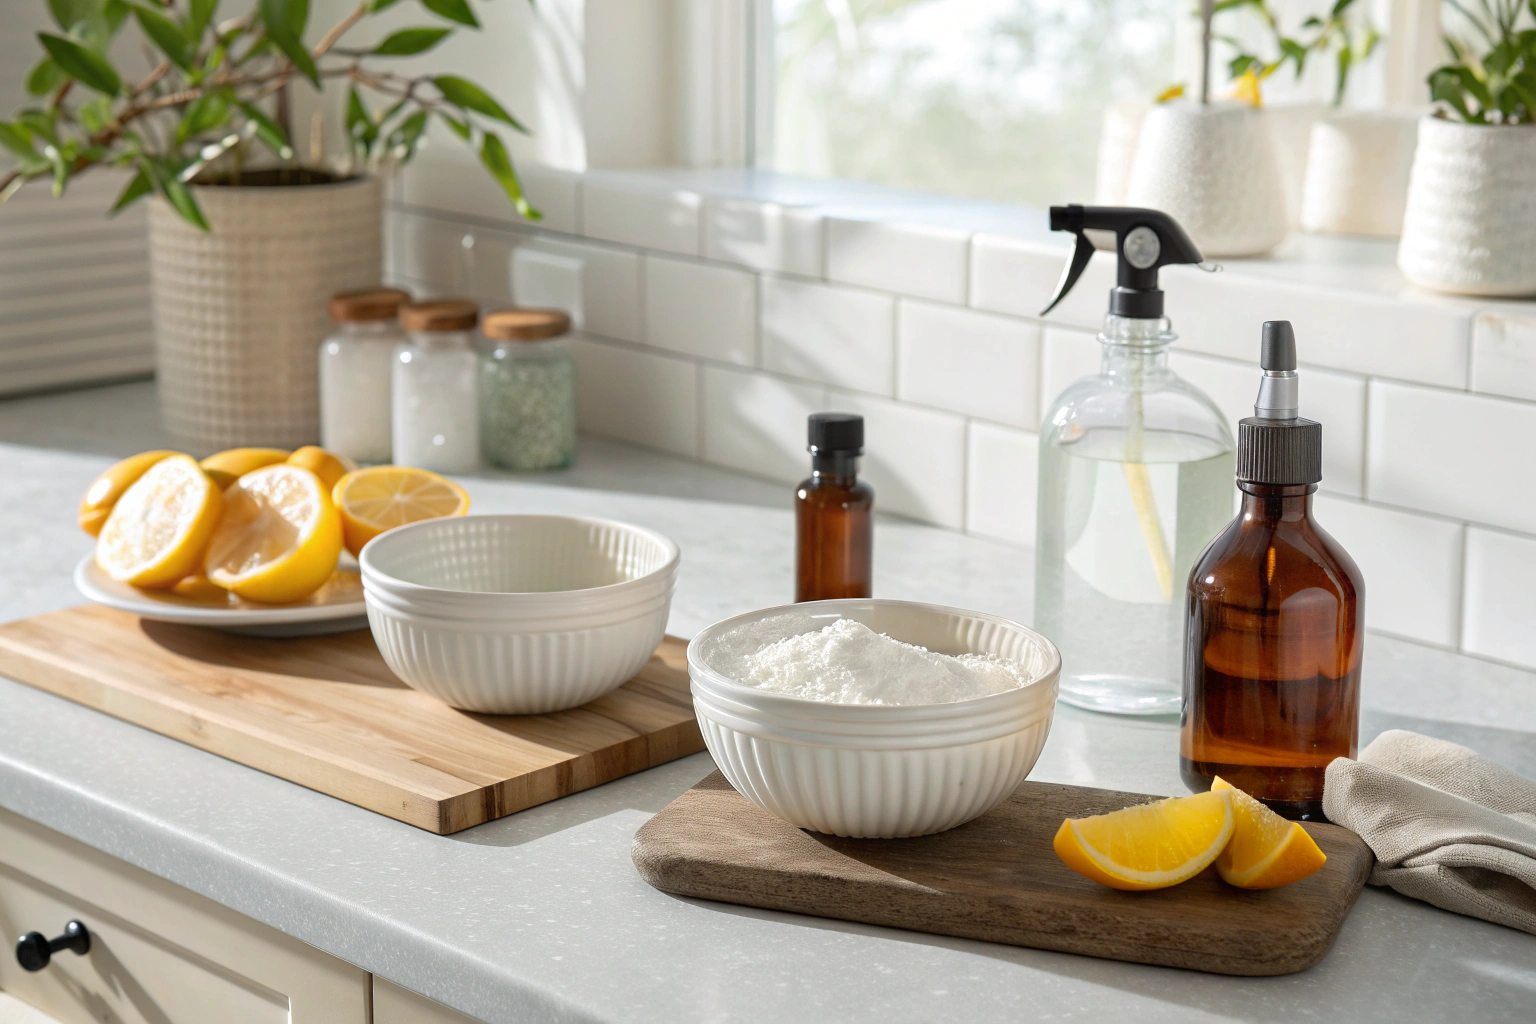
Essential Ingredients for Safe and Effective Floor Cleaning
The transition from commercial cleaners to natural alternatives doesn’t mean compromising on cleanliness. In fact, some of the most effective cleaning agents have been used for centuries and are sitting right in your kitchen pantry. Through extensive testing in my own multi-pet household, I’ve discovered that understanding how these natural ingredients work makes them even more powerful than their chemical counterparts.
Many ingredients overlap with my general Natural Cleaner—but with pet-specific adjustments for toxicity.
White vinegar stands as the cornerstone of natural floor cleaning. Its acetic acid content (typically 5%) breaks down mineral deposits, cuts through grease, and creates an environment hostile to bacteria and mold. The acidic pH disrupts bacterial cell walls, providing natural disinfection without harsh chemicals. Unlike ammonia-based cleaners, vinegar’s antimicrobial properties come without respiratory risks to pets.
Baking soda functions as nature’s deodorizer and gentle abrasive. As a mild alkali, it neutralizes acids that cause odors – particularly effective against pet urine, which is naturally acidic. The fine crystalline structure provides just enough abrasion to lift stuck-on dirt without scratching surfaces. Most importantly, baking soda is completely safe if pets happen to ingest small amounts during their normal grooming routines.
“A simple mixture of one cup of vinegar and one liter of water is the safest floor cleaner for both kids and pets—free from toxic chemicals and scents. This inexpensive and easy-to-make solution cuts through grease and grime on most surfaces.”
— Furchild Pets, September 2024
Source link
Dish soap serves as the emulsifying agent that lifts oils and grime from surfaces. Plant-based castile soap works particularly well because it lacks the synthetic fragrances and harsh sulfates found in conventional dish soaps. The surfactant properties allow water to penetrate and lift away dirt that would otherwise cling to floor surfaces.
Lemon juice provides additional grease-cutting power through its citric acid content while adding natural fragrance. The natural oils in lemon peels also contain antimicrobial compounds, though these should be used sparingly around cats who can be sensitive to citrus oils.
| Ingredient | Cleaning Function | Best For | Pet Safety Notes |
|---|---|---|---|
| White Vinegar | Cuts grease, disinfects, removes mineral deposits | All floors except natural stone | Safe when diluted, avoid concentrated amounts |
| Baking Soda | Deodorizes, gentle abrasion, neutralizes acids | Tile, laminate, spot cleaning | Completely safe, edible in small amounts |
| Dish Soap | Emulsifies oils, lifts dirt and grime | All floor types | Use castile or plant-based varieties |
| Lemon Juice | Cuts grease, adds shine, natural fragrance | Sealed surfaces only | Safe in cleaning dilutions |
| Essential Oils | Antimicrobial, pleasant scent | All floors (proper dilution) | Avoid tea tree, eucalyptus around cats |
Essential oils require careful selection in pet households. While lavender and chamomile are generally safe for both dogs and cats, tea tree oil and eucalyptus can be toxic to cats even in small amounts. When using essential oils, proper dilution is crucial – typically no more than 10-15 drops per gallon of cleaning solution.
The key to success with natural ingredients lies in understanding their limitations and optimal combinations. Vinegar shouldn’t be used on natural stone surfaces like marble or granite, as the acid can etch the stone. Similarly, while these ingredients are individually safe, combining them in the wrong proportions can reduce effectiveness or create unpleasant reactions.
- White vinegar (5% acidity) works best for cleaning
- Choose fragrance-free dish soap to avoid pet sensitivities
- Test essential oils – some pets are sensitive to strong scents
- Buy ingredients in bulk to save money
- Store baking soda in airtight containers to maintain effectiveness
Through months of testing different combinations and concentrations, I’ve found that these natural ingredients not only clean as effectively as commercial products but often surpass them in specific applications. The bonus is knowing exactly what’s in contact with my pets’ paws and what they might encounter during their daily activities throughout the house.
Prepping Your Space and Supplies
Proper preparation forms the foundation of successful DIY floor cleaning and ensures both effectiveness and safety for your pets. Having learned through trial and error, I’ve developed a systematic approach that prevents common mistakes and creates the safest possible environment during the cleaning process.
The workspace setup begins with pet safety as the primary concern. Even natural ingredients can cause problems if pets are underfoot during mixing or if they access wet floors before proper drying. Creating a dedicated preparation area, away from curious noses and paws, prevents accidents and allows you to focus on creating effective cleaning solutions.
Container selection plays a crucial role in both safety and effectiveness. Glass spray bottles work best for most solutions, as they don’t retain odors and allow you to see the solution clearly. However, any solutions containing hydrogen peroxide require dark containers, as light degrades its cleaning effectiveness. Plastic containers work fine for most recipes but should be replaced periodically as they can absorb odors over time.
- Secure pets in separate room with water and comfort items
- Gather clean spray bottles, measuring cups, and labels
- Ensure adequate ventilation by opening windows
- Test cleaner on inconspicuous floor area first
- Identify your floor type (hardwood, tile, laminate, etc.)
- Never mix bleach-based products with vinegar or ammonia
- Label all containers with ingredients and date made
- Keep workspace organized to avoid contamination
Floor type identification is essential before selecting any cleaning recipe. Hardwood floors require gentler, less acidic solutions to avoid damaging protective finishes. Natural stone surfaces like marble or granite cannot tolerate acidic cleaners at all. Tile and laminate floors are more forgiving but still benefit from appropriate cleaner selection based on their specific composition and finish.
The testing process cannot be overstated in importance. Even natural cleaners can cause discoloration or damage if they’re incompatible with your specific flooring. Choose an inconspicuous area – typically behind a door or under furniture – and apply a small amount of your chosen cleaner. Wait 10-15 minutes, then check for any adverse reactions like discoloration, dulling, or surface etching.
- NEVER mix bleach + vinegar = toxic chlorine gas
- NEVER mix ammonia + bleach = toxic chloramine
- Store hydrogen peroxide in dark containers
- Keep all cleaners away from pets during preparation
Ventilation remains important even with natural cleaners. While these ingredients don’t produce toxic fumes like commercial products, proper air circulation speeds drying time and prevents the buildup of any residual odors that might bother sensitive pets. Opening windows or using fans creates better working conditions and faster floor drying.
Labeling your homemade cleaners serves multiple safety functions. Clear labels prevent accidental misuse, help you track which formulas work best for different situations, and provide important information if a pet or child accidentally ingests the product. Include the recipe name, ingredients, date made, and any special instructions for use.
The preparation phase also involves gathering appropriate tools for application. Microfiber mops work best for hardwood floors as they’re gentle and highly absorbent. Traditional string mops or flat mops work well for tile and laminate. Having multiple clean cloths available allows you to dry surfaces quickly and prevents cross-contamination between different areas of your home.
My Tested DIY Pet Safe Floor Cleaner Recipes
After discovering the dangers of commercial cleaners through Max’s health scare, I embarked on a comprehensive testing journey to develop truly effective, pet-safe alternatives. Over eighteen months, I tested dozens of formulations across different floor types in homes with various pets – from single-cat apartments to households with multiple large dogs.
My testing methodology focused on real-world effectiveness rather than laboratory conditions. Each recipe had to pass three critical tests: remove common pet-related messes (mud, hair, occasional accidents), leave floors genuinely clean without residue, and cause no adverse reactions in pets who returned to treated areas. I also evaluated cost-effectiveness, ease of preparation, and storage stability.
The recipes that follow represent the most successful formulations from this extensive testing period. Each has been validated in multiple pet households and across different flooring types. The basic formulation principle underlying all successful recipes involves combining a liquid base (usually water) with a primary cleaning agent (vinegar, soap, or both) and optional enhancement ingredients (essential oils, lemon juice) for improved scent or cleaning power.
Understanding this framework helps you customize recipes for your specific needs while maintaining their effectiveness and safety. The key is maintaining proper ratios – too much cleaning agent can leave residue, while too little reduces cleaning power. Each recipe provides the optimal balance discovered through extensive real-world testing.
All Purpose Pet Safe Floor Cleaner
This versatile formula emerged as the most reliable solution for everyday cleaning across multiple surface types. Born from testing over thirty different combinations, this recipe consistently delivered excellent results while remaining completely safe for pets and children. The synergistic effect of combining vinegar’s natural disinfecting properties with dish soap’s powerful degreasing action creates a cleaner that rivals commercial products in effectiveness.
The development story of this recipe involved weeks of adjusting proportions to achieve the perfect balance. Too much vinegar left floors with a strong odor that bothered some pets, while too much dish soap created excessive suds and residue. The breakthrough came when I discovered that adding the soap to warm water first, then incorporating the vinegar, prevented the soap from curdling and created a more stable solution.
Vinegar provides the disinfecting backbone of this formula, with its 5% acetic acid content effectively killing bacteria, mold, and many viruses. The acid also cuts through mineral deposits from hard water and breaks down organic soils. Dish soap emulsifies oils and lifts embedded dirt, while its surfactant properties allow the solution to spread evenly and penetrate into surface irregularities where dirt hides.
The optional lemon juice adds extra grease-cutting power through its citric acid content and provides a fresh, clean scent that most pets tolerate well. Essential oils like lavender or eucalyptus (safe for dogs, but use eucalyptus sparingly around cats) add natural antimicrobial properties and a pleasant fragrance that helps neutralize any residual pet odors.
- Mix 2 cups warm water + 1/2 cup white vinegar in spray bottle
- Add 1/4 cup dish soap and swirl gently to combine
- Optional: Add 1 tablespoon lemon juice for extra grease-cutting
- Optional: Add 10 drops pet-safe essential oil (lavender or eucalyptus)
- Shake gently before each use
- Spray on floor and mop with damp cloth
- No rinsing required – air dry completely
This formula works exceptionally well on tile, laminate, vinyl, and sealed surfaces. I’ve observed excellent results removing paw prints, food spills, and general traffic soil. The cleaning action is immediate, and the solution dries without leaving streaks or sticky residue that might attract dirt or bother pets walking across treated surfaces.
One significant advantage of this recipe is its stability – it maintains effectiveness for 2-3 months when stored properly. The ingredients don’t separate significantly, and the cleaning power remains consistent over time. This makes it practical for regular use without requiring frequent remixing.
Specialized Hardwood Floor Solution
Hardwood floors present unique challenges in pet households, requiring cleaners that remove pet hair and dander without damaging delicate finishes or leaving residue that dulls the wood’s natural beauty. After testing numerous formulations on different types of hardwood flooring, this gentle, pH-balanced solution emerged as the clear winner.
The key insight behind this recipe lies in understanding why hardwood requires special consideration. Excess water can penetrate between boards and cause warping, while acidic cleaners can strip protective finishes over time. Oil-based ingredients must be used sparingly to avoid buildup, yet they’re essential for conditioning the wood and maintaining its natural luster.
This formula uses heavily diluted vinegar to provide gentle cleaning action without the harsh acidity that can damage wood finishes. The olive oil or avocado oil serves dual purposes – it conditions the wood fibers to prevent drying and cracking while providing just enough lubrication to lift embedded dirt without scratching. A few drops of dish soap emulsify the oil and help the solution spread evenly.
“For hardwood flooring, mix 4 cups warm water and a few drops of castile soap. For tile or vinyl, pour 1 cup of vinegar (white or apple cider) and 1 litre of water into your mop bucket—safe alternatives for pets who spend most of their time on the floor.”
— Adored Beast, March 2025
Source link
The recipe calls for 1 gallon of warm water, 1/2 cup white vinegar (creating a very mild acid solution), 1 tablespoon of olive oil or avocado oil, a few drops of dish soap, and optional lemon juice for natural shine enhancement. The proportions create a pH-balanced solution that cleans effectively while respecting the wood’s needs.
Application technique is crucial for hardwood floors. The solution should be applied sparingly using a spray bottle or a well-wrung mop that’s barely damp. Excess moisture is the enemy of hardwood floors, potentially causing cupping, warping, or finish damage. Work in small sections and dry immediately with a clean cloth to prevent water from sitting on the surface.
- DO: Test in inconspicuous area first
- DO: Use minimal moisture – spray bottle or well-wrung mop
- DO: Dry immediately with clean cloth
- DON’T: Use excessive water – damages wood
- DON’T: Use harsh chemicals or abrasive tools
- DON’T: Let solution sit on wood surface
This formula excels at removing pet hair and dander while maintaining the wood’s natural beauty. The conditioning oils help prevent the drying that can occur in homes with pets, where frequent cleaning is necessary. I’ve observed that floors treated with this solution maintain their luster longer and seem to resist showing pet traffic patterns as quickly as floors cleaned with commercial products.
Tile and Laminate Floor Cleaner
Tile and laminate surfaces in pet households face unique challenges – they show paw prints easily, collect pet hair in grout lines, and often bear the brunt of muddy entries and food spills. This streak-free formula combines vinegar’s powerful cleaning action with baking soda’s gentle abrasive properties to tackle stubborn, pet-related grime without leaving residue or dulling surface finishes.
The development of this recipe focused on addressing the specific problems I observed in high-traffic pet areas. Standard cleaners often left streaks on tile or created a film on laminate that actually attracted more dirt. The breakthrough came when I discovered that the mild chemical reaction between baking soda and vinegar creates additional cleaning power without producing harmful byproducts.
When baking soda meets vinegar, the resulting fizzing reaction helps lift embedded dirt from grout lines and surface textures where pet hair and debris tend to accumulate. The dish soap component emulsifies oils from paw prints and food spills, while the vinegar provides streak-free drying and natural disinfection.
- Sweep or vacuum to remove loose pet hair and debris
- Mix 1 gallon hot water + 1/2 cup vinegar + 2 tbsp baking soda + 1 tbsp dish soap
- Allow baking soda fizzing reaction to settle (normal reaction)
- Mop using figure-8 pattern for streak-free results
- Pay extra attention to high-traffic pet areas
- No rinsing needed – solution dries residue-free
- Air dry or wipe with clean cloth for faster drying
The hot water component is important for this formula – it helps dissolve the baking soda more completely and improves the overall cleaning action. The temperature also helps lift oils and sticky residues more effectively than cold water solutions. However, the water shouldn’t be so hot that it creates excessive steam, which could bother pets with respiratory sensitivities.
Application technique makes a significant difference in results. The figure-8 mopping pattern prevents streaking by ensuring even coverage and avoiding the linear streaks that can occur with back-and-forth mopping. Paying extra attention to high-traffic areas where pets frequently walk helps remove the accumulated oils and dirt that can make these areas appear darker or duller than surrounding surfaces.
This formula has proven exceptionally effective at handling the challenges specific to pet households. It removes muddy paw prints without excessive scrubbing, lifts pet hair from grout lines, and neutralizes the slight odors that can accumulate in areas where pets spend significant time. The streak-free drying is particularly important for maintaining the appearance of glossy tile and laminate surfaces.
Pet Stain and Odor Eliminator for Floors
Pet accidents are an inevitable reality in animal households, and addressing them quickly and effectively prevents permanent staining and eliminates odors that might encourage repeat incidents. This powerful formula uses hydrogen peroxide’s oxidizing action combined with baking soda’s neutralizing properties to tackle both visible stains and invisible odor compounds at the molecular level.
The science behind this recipe centers on understanding how pet urine creates lasting odors. Uric acid crystals form as urine dries, and these crystals continue producing odor even after the visible stain is cleaned. Hydrogen peroxide (3% solution) breaks down these uric acid crystals through oxidation, while baking soda neutralizes the acidic pH and absorbs moisture that bacteria need to produce additional odors.
The dish soap component helps the solution penetrate into porous surfaces and grout lines where urine might have seeped. This penetration is crucial because surface cleaning alone often fails to address odor sources that have absorbed into subflooring or deep into grout. The combination creates a formula that addresses both immediate cleaning needs and long-term odor prevention.
| Factor | DIY Solution | Commercial Products |
|---|---|---|
| Cost per use | $0.25-0.50 | $2.00-5.00 |
| Pet safety | Completely safe ingredients | May contain harsh chemicals |
| Odor elimination | Neutralizes at molecular level | Often masks odors temporarily |
| Environmental impact | Biodegradable, eco-friendly | Chemical runoff concerns |
| Ingredient transparency | Know exactly what’s used | Proprietary formulas |
The recipe combines 2 cups of hydrogen peroxide (3% solution), 2 tablespoons of baking soda, and 1 teaspoon of dish soap. The proportions are important – too much hydrogen peroxide can bleach some surfaces, while insufficient amounts won’t provide adequate oxidizing power. Too much baking soda creates a paste that’s difficult to work with, while too little reduces the pH neutralizing effect.
- Blot fresh accidents immediately with paper towels
- Mix 2 cups hydrogen peroxide (3%) + 2 tbsp baking soda + 1 tsp dish soap
- Apply solution generously to saturate affected area completely
- Let sit 10-15 minutes to break down odor compounds
- Blot with clean cloth and rinse with water
- Sprinkle additional baking soda if odor persists
- Vacuum when completely dry
This formula has proven remarkably effective at eliminating both fresh accidents and older stains that previous cleaning attempts failed to address completely. The key is generous application – the solution must saturate the area to reach all the urine that may have penetrated below the surface. The 10-15 minute dwell time allows the chemical reactions to work fully before removal.
For persistent odors, the additional baking soda application provides extended neutralizing action. As it sits, baking soda continues absorbing any remaining odor compounds and moisture. Vacuuming when completely dry removes the baking soda along with the absorbed odors, leaving the area fresh and clean.
Application Techniques for Best Results
Proper application technique can mean the difference between floors that look truly clean and those that appear streaky, sticky, or still harbor odors that might bother pets. Through extensive trial and error in multiple pet households, I’ve developed specific methods that maximize cleaning effectiveness while maintaining safety for both pets and the people doing the cleaning.
Dwell time represents one of the most critical factors in effective cleaning. General cleaning solutions need 3-5 minutes of contact time to break down dirt and oils effectively. Rushing this process by immediately mopping up the solution reduces cleaning power significantly. For stain removal, 10-15 minutes allows the chemical reactions to work completely, breaking down odor compounds and lifting embedded soils.
Tool selection varies by floor type and cleaning goal. Microfiber mops work exceptionally well for hardwood floors because their fine fibers lift dirt without scratching, and they’re highly absorbent for immediate drying. Traditional string mops or flat mops suit tile and laminate floors better, as they can handle the slightly more aggressive cleaning these surfaces can tolerate. Spray bottles provide precise application for spot cleaning and allow better control of moisture levels on sensitive surfaces.
The figure-8 mopping pattern prevents streaking by ensuring even coverage and avoiding the linear patterns that can occur with back-and-forth motions. This technique is particularly important on glossy surfaces where streaks are most visible. Starting from the farthest corner and working toward the exit prevents walking on freshly cleaned areas and redepositing dirt.
- Over-wetting floors can cause damage and slow drying
- Using too much solution leaves sticky residue
- Inadequate ventilation traps moisture and odors
- Allowing pets on wet floors creates safety hazards
- Skipping the test patch can damage flooring
- Not following dwell times reduces cleaning effectiveness
Dilution ratios matter more than many people realize. The temptation to use “more for better cleaning” often backfires, creating sticky residues that actually attract more dirt and can irritate pets’ paw pads. Following recipe proportions exactly ensures optimal cleaning without negative side effects. If cleaning power seems insufficient, it’s better to repeat the process than to increase concentration.
Ventilation remains important even with natural cleaners. Proper air circulation speeds drying time, prevents moisture buildup that can damage floors or encourage mold growth, and helps dissipate any residual odors from the cleaning process. Opening windows or using fans creates better conditions for both cleaning effectiveness and pet comfort.
Surface safety testing should occur before allowing pets back into cleaned areas. Even natural cleaners can leave residues if not properly diluted or if surfaces weren’t adequately dried. The simple test is whether you would be comfortable licking the surface – if there’s any sticky feeling, visible residue, or strong odor, the area needs additional rinsing or drying time.
- General cleaning: 3-5 minute dwell time
- Stain removal: 10-15 minute dwell time
- Use microfiber mops for hardwood, traditional mops for tile
- Figure-8 mop pattern prevents streaking
- Open windows even with natural ingredients
- High-traffic areas: weekly cleaning
- Full floor cleaning: bi-weekly
- Spot clean as needed
Frequency recommendations based on pet household experience suggest weekly attention to high-traffic areas where pets frequently walk, eat, or rest. Full floor cleaning every two weeks maintains overall cleanliness without over-cleaning, which can actually damage some floor finishes over time. Spot cleaning should happen immediately when accidents or spills occur, preventing stains from setting and odors from developing.
The most successful approach treats floor cleaning as an ongoing maintenance process rather than a periodic deep-cleaning event. Daily dry mopping or sweeping removes the majority of pet hair and tracked debris before it can be ground into surfaces. Weekly damp cleaning with appropriate solutions maintains hygiene and appearance. This routine approach reduces the need for intensive cleaning sessions that might require stronger solutions or longer pet exclusion periods.
Other Pet Safety Tips During Cleaning
Creating a comprehensive safety protocol extends far beyond choosing pet-safe cleaning ingredients. The entire cleaning process, from preparation through completion, requires careful attention to protecting pets and ensuring they can safely return to treated areas. Through managing multi-pet households during countless cleaning sessions, I’ve developed systematic approaches that minimize risk and stress for both pets and their owners.
After cleaning, soothe your pet’s paws or skin with my Homemade Dog Anti-Itch Spray.
Before cleaning begins, pet safety preparation sets the foundation for successful cleaning sessions. Securing pets in a comfortable, separate room prevents them from walking through wet areas, inhaling cleaning vapors (even natural ones), or becoming anxious from the disruption to their routine. Providing water, comfortable bedding, and perhaps a favorite toy helps pets remain calm during their temporary relocation.
During the cleaning process, maintaining pet separation becomes crucial even with natural cleaners. While these solutions are significantly safer than commercial alternatives, wet floors present slip hazards, and even natural ingredients shouldn’t be ingested in cleaning concentrations. Keeping doors closed and using baby gates helps ensure pets remain safely separated until floors are completely dry and residue-free.
Ventilation management serves multiple safety functions during cleaning. Opening windows and using fans not only speeds drying time but also prevents the buildup of any vapors that might irritate sensitive pets. Some animals have respiratory sensitivities that can be triggered even by natural scents like vinegar or essential oils. Proper air circulation minimizes these potential issues.
- BEFORE: Secure pets in separate room with water and comfort items
- BEFORE: Remove pet toys and food bowls from cleaning area
- BEFORE: Ensure good ventilation throughout house
- DURING: Maintain pet separation until floors are completely dry
- DURING: Never mix different cleaning products
- AFTER: Test surfaces are residue-free before allowing pet access
- AFTER: Wait 30-60 minutes minimum before pet return
- AFTER: Observe pets for any reactions upon return
Surface safety verification before allowing pet access involves multiple checkpoints. Visual inspection should reveal no visible residue, sticky spots, or standing moisture. A touch test helps identify any areas that might feel tacky or slippery under pet paws. The smell test ensures no strong odors remain that might irritate sensitive pets or mask important environmental cues they rely on.
Post-cleaning observation of pets upon their return to cleaned areas helps identify any sensitivities or reactions. Watch for excessive paw licking, which might indicate residue irritation, or respiratory changes that could suggest sensitivity to residual scents. Most pets adapt quickly to the clean environment, but monitoring their initial reactions helps identify any needed adjustments to your cleaning routine.
Timing considerations affect both cleaning effectiveness and pet safety. Cleaning during pets’ natural rest periods reduces stress and makes separation easier. Allowing adequate drying time – typically 30-60 minutes depending on ventilation and humidity – ensures surfaces are completely safe for pet contact. Rushing this process can create safety hazards or require re-cleaning if pets track dirt onto damp floors.
The water bowl consideration deserves special attention in pet households. Some pets drink from toilet bowls, making it important to ensure these areas receive the same safety attention as floors. Even natural cleaners shouldn’t be ingested in cleaning concentrations, so toilet bowl access should be restricted until after thorough rinsing and drying.
Emergency preparedness for potential accidents involves knowing what to do if pets do encounter cleaning solutions inappropriately. Having your veterinarian’s contact information readily available, knowing the ingredients in your cleaning solutions, and understanding basic first aid for chemical exposure (even natural chemicals) provides peace of mind and practical preparation.
Storage and Shelf Life of Your Homemade Cleaners
Proper storage of homemade cleaning solutions ensures both their continued effectiveness and the safety of curious pets who might encounter them. Unlike commercial products with stabilizers and preservatives, DIY cleaners require more careful attention to storage conditions and shelf life to maintain their cleaning power and prevent degradation that could create safety issues.
Container selection significantly impacts both storage success and safety. Glass spray bottles work best for most solutions because they don’t absorb odors, allow easy monitoring of solution clarity, and don’t react with ingredients. However, solutions containing hydrogen peroxide require dark bottles, as light exposure degrades the peroxide’s effectiveness over time. Plastic containers work adequately for short-term storage but should be replaced periodically as they can absorb odors and may react with certain ingredients over extended periods.
Labeling systems serve crucial safety functions in pet households. Clear, detailed labels prevent accidental misuse and provide essential information if pets or children encounter the products. Each label should include the recipe name, complete ingredient list, preparation date, expiration date, and basic usage instructions. Using waterproof labels or covering paper labels with clear tape prevents smudging that could make important information illegible.
Storage location selection requires balancing accessibility for regular use with safety from curious pets and children. Cool, dark cabinets work best for maintaining ingredient stability, while child-proof latches add extra security in households with young children or particularly clever pets. Storage areas should be separate from food preparation and pet feeding areas to prevent accidental contamination or confusion.
| Formula Type | Storage Container | Shelf Life | Signs to Replace |
|---|---|---|---|
| Vinegar-based | Glass or plastic spray bottle | 2-3 months | Cloudy appearance, weak cleaning |
| Hydrogen peroxide formulas | Dark bottle only | 1 month | No fizzing action, odor changes |
| Oil-containing recipes | Glass preferred | 1-2 weeks | Rancid smell, separation |
| Baking soda solutions | Make fresh each time | Single use | Doesn’t store well |
Shelf life variations depend heavily on specific ingredients and storage conditions. Vinegar-based solutions remain stable for 2-3 months when stored properly, as vinegar itself is naturally preservative. Hydrogen peroxide formulas degrade more quickly, losing effectiveness after about one month, particularly if exposed to light or stored in warm conditions. Oil-containing recipes have the shortest shelf life, typically 1-2 weeks, as natural oils can become rancid and develop unpleasant odors.
Effectiveness testing helps determine when solutions need replacement before they become ineffective or potentially problematic. Solutions that appear cloudy, have developed unusual odors, or seem to clean less effectively should be discarded and replaced. Hydrogen peroxide solutions that no longer fizz when applied to organic matter have lost their oxidizing power and should be replaced.
Temperature considerations affect both storage stability and safety. Extreme temperatures can cause ingredient separation, reduce effectiveness, or create safety hazards. Freezing can damage spray bottle mechanisms and cause ingredient separation, while excessive heat can accelerate degradation and potentially create pressure in sealed containers. Room temperature storage in stable conditions works best for most formulations.
- DO: Use child-proof latches if needed
- DO: Store in cool, dark cabinets
- DO: Label with contents, date, and expiration
- DON’T: Store near food or pet supplies
- DON’T: Use containers pets might chew
- DON’T: Assume natural means safe for unsupervised access
Safety considerations for storage extend beyond basic childproofing. Some pets are notorious chewers who might damage containers and create spills, while others are climbers who can access seemingly secure storage areas. Understanding your pets’ capabilities and behaviors helps determine appropriate storage security levels. Even natural cleaners should be stored securely – while they’re safer than commercial alternatives, they’re still not intended for pet consumption.
Inventory management becomes important as you develop multiple specialized formulas for different cleaning needs. Rotating stock using the “first in, first out” principle ensures you’re always using the freshest solutions. Keeping a simple log of preparation dates and ingredient sources helps track which formulations work best and when replacements are needed.
The goal of proper storage is maintaining both effectiveness and safety while making regular cleaning convenient and stress-free. Well-organized, properly labeled, and safely stored cleaning solutions support consistent cleaning routines that keep both floors and pets healthy and happy.
Maintaining Clean Floors Between Deep Cleanings
Preventative maintenance strategies dramatically reduce the frequency of intensive floor cleaning while keeping pet households consistently clean and healthy. Through managing homes with multiple pets, I’ve discovered that strategic prevention eliminates most cleaning challenges before they become problems, creating more time for enjoying pets rather than constantly cleaning up after them.
Entry point management forms the foundation of preventative floor care. Installing quality mats both inside and outside doors where pets enter captures the majority of dirt, moisture, and debris before it spreads throughout the house. Heavy-duty outdoor mats trap mud and moisture from paws, while absorbent indoor mats catch whatever passes through the first barrier. Washable mats allow regular cleaning to maintain their effectiveness.
Paw cleaning stations at primary entry points provide immediate intervention for muddy or wet paws. Keeping clean towels, pet wipes, or even a shallow pan of clean water near doors allows quick paw cleaning before pets walk through the house. This simple step prevents the majority of tracked-in dirt and reduces the need for frequent floor cleaning.
Regular pet grooming significantly impacts floor cleanliness by reducing the amount of hair, dander, and outdoor debris pets bring indoors. Daily brushing removes loose fur before it falls onto floors, while regular nail trimming reduces scratches and gouges that can trap dirt and make cleaning more difficult. Clean pets contribute to cleaner floors with less effort.
- Place entry mats inside and outside doors where pets enter
- Create paw cleaning station with towels at entry points
- Brush pets daily to minimize shedding and dander
- Use washable runners in high-traffic pet pathways
- Daily 5-minute sweep removes most debris before it spreads
- Address pet accidents immediately to prevent staining
- Place waterproof mats under pet food and water bowls
- Keep pet nails trimmed to reduce floor scratching
- Train pets to use designated areas when possible
- Weekly spot cleaning of high-touch areas prevents buildup
Strategic runner placement in high-traffic areas protects floors from the concentrated wear that occurs in pet pathways. Washable runners in hallways, along favorite pet routes, and in front of frequently used doors absorb the daily impact of pet traffic. These runners can be washed regularly, maintaining cleanliness without requiring floor cleaning in these high-impact areas.
Daily maintenance routines require minimal time investment but provide maximum impact on overall cleanliness. A quick 5-minute sweep or dry mop each morning removes the majority of pet hair and tracked debris before it can be ground into floor surfaces. This simple routine prevents the accumulation that makes weekly cleaning sessions more intensive and time-consuming.
Immediate accident response prevents minor incidents from becoming major cleaning projects. Having cleaning supplies readily accessible in areas where pets spend time allows quick response to spills, accidents, or tracked-in mud. The faster the response, the easier the cleanup and the less likely permanent staining or odor development becomes.
Feeding station organization addresses one of the most common sources of floor soiling in pet households. Waterproof mats under food and water bowls catch spills and splashes before they reach floors. Elevated feeding stations can reduce spills for some pets, while splash guards around water bowls contain enthusiastic drinkers’ messes.
Pet training integration with floor maintenance creates long-term solutions for common problems. Teaching pets to wait for paw cleaning after outdoor activities, training them to use specific areas for eating and drinking, and establishing boundaries around freshly cleaned areas all contribute to maintaining cleaner floors with less effort.
Weekly spot maintenance of high-impact areas prevents the buildup that necessitates intensive cleaning sessions. Quick attention to areas around pet beds, feeding stations, and favorite resting spots maintains overall cleanliness between comprehensive cleaning sessions. These targeted efforts take minutes but prevent hours of intensive cleaning later.
The cumulative effect of these preventative measures significantly reduces the time and effort required for floor maintenance while creating a consistently cleaner, healthier environment for both pets and their families. Prevention truly proves more effective than intensive cleaning after problems develop.
DIY Cleaning vs Professional Services
Choosing between DIY cleaning solutions and professional floor cleaning services involves weighing multiple factors specific to pet households. Both approaches have distinct advantages and limitations, and understanding these helps pet owners make informed decisions based on their specific circumstances, budget constraints, and pet safety priorities.
DIY advantages center primarily around complete control over ingredients and processes. When you make your own cleaners, you know exactly what touches your floors and what your pets might encounter. This transparency becomes particularly valuable for pets with chemical sensitivities or allergies. The cost effectiveness of DIY solutions is substantial – ingredients like vinegar, baking soda, dish soap, and olive oil cost pennies per use compared to commercial products or professional services.
Professional service advantages focus on equipment capabilities and expertise that most homeowners cannot match. Professional-grade extraction equipment can remove deeply embedded dirt and odors that surface cleaning cannot address. Experienced technicians understand how to handle different flooring types safely and can identify problems that might not be apparent to homeowners.
Decision criteria should consider several key factors: budget availability, time constraints, floor condition and type, severity of pet-related issues, and personal confidence in DIY approaches. Households with severe pet odor problems, extensive staining, or valuable flooring might benefit from professional intervention, while homes with routine maintenance needs often find DIY solutions completely adequate.
| Factor | DIY Cleaning | Professional Services |
|---|---|---|
| Monthly cost | $5-15 for supplies | $100-300 per visit |
| Ingredient control | Complete control over products | Must trust service provider |
| Scheduling flexibility | Clean anytime needed | Limited to service availability |
| Deep cleaning power | Good for maintenance | Superior equipment and expertise |
| Pet safety assurance | Know exactly what’s used | Must verify products are pet-safe |
| Time investment | Requires personal time | Saves time and physical effort |
When to choose professional services typically involves specific circumstances: move-in or move-out situations requiring comprehensive deep cleaning, annual maintenance for high-traffic homes, specialty flooring requiring expert knowledge, or serious pet-related damage that DIY methods cannot address. Professional services also make sense when physical limitations prevent homeowners from performing adequate cleaning themselves.
Questions for professional services ensure pet safety and service quality. Essential inquiries include asking about specific products used and their pet safety profiles, understanding how long pets must remain away from treated areas, requesting green or natural cleaning options, and asking to see ingredient lists for cleaning products. Experienced pet-friendly services should readily provide this information and demonstrate understanding of pet-related concerns.
- What products do you use and are they pet-safe?
- How long before pets can access cleaned areas?
- Do you offer green or natural cleaning options?
- Can I see ingredient lists for your cleaning products?
- What preparation is needed for pet households?
- Do you have experience with pet-related stains and odors?
Preparation for professional services in pet households requires specific steps to ensure both service quality and pet safety. Securing pets in safe, comfortable areas away from cleaning activities prevents stress and potential exposure to cleaning products. Communicating specific pet sensitivities or concerns helps technicians adjust their approach appropriately. Requesting advance notice of products to be used allows time to research their safety profiles.
Cost-benefit analysis extends beyond simple price comparisons. DIY approaches require time investment for shopping, mixing, and applying cleaners, plus the learning curve for developing effective techniques. Professional services save time and physical effort but cost significantly more and may require scheduling compromises. The value equation varies based on individual circumstances and priorities.
Hybrid approaches often provide optimal solutions for many pet households. Using DIY methods for routine maintenance while scheduling professional deep cleaning annually or semi-annually combines cost effectiveness with thorough care. This approach maintains daily cleanliness while ensuring periodic deep cleaning that addresses issues beyond routine maintenance capabilities.
Quality assessment differs between DIY and professional approaches. DIY success depends on consistent application of proper techniques and realistic expectations about what home methods can achieve. Professional service quality varies significantly between providers, making research and referrals important for finding services that truly understand pet household needs.
The best choice often depends on viewing floor care as an ongoing process rather than isolated cleaning events. Understanding when each approach works best allows pet owners to create comprehensive floor care strategies that maintain cleanliness, safety, and cost effectiveness over time.
My Journey to Creating Pet Safe Cleaners: Lessons Learned
The path to developing these pet-safe cleaning solutions began with a crisis that forever changed how I think about household products and pet safety. Max’s respiratory distress after exposure to commercial floor cleaner served as a wake-up call that prompted months of research, experimentation, and gradual transition to completely natural cleaning methods.
Initially, my motivation was purely reactive – I needed alternatives that wouldn’t harm my pets. However, as I delved deeper into ingredient research and began testing natural formulations, the journey evolved into something much more comprehensive. I discovered that creating effective, safe cleaners required understanding not just what to avoid, but why natural ingredients work and how to combine them for maximum effectiveness.
The learning curve proved steeper than anticipated. Early attempts at natural cleaning often fell short of expectations – floors that looked clean but felt sticky, solutions that left streaks, or formulas that separated quickly and lost effectiveness. Each failure provided valuable lessons about proper ratios, ingredient compatibility, and application techniques that eventually led to the successful formulations shared in this article.
Unexpected benefits emerged as the transition progressed. Beyond the obvious pet safety improvements, I noticed reduced chemical sensitivity symptoms in family members, significant cost savings compared to commercial products, and a sense of satisfaction from knowing exactly what was being used in our home. The environmental benefits became apparent as we reduced packaging waste and eliminated harsh chemicals from entering water systems through household drains.
Research challenges included separating marketing claims from scientific facts about both commercial and natural cleaning ingredients. Learning to evaluate ingredient safety specifically for pets required understanding their unique physiological differences from humans – how they absorb chemicals through paw pads, their grooming behaviors that increase ingestion risks, and their size-related vulnerabilities to toxic exposure.
Testing methodology development became crucial for validating effectiveness. Rather than relying on theoretical cleaning power, I established real-world testing criteria: ability to remove common pet messes, safety for immediate pet contact after drying, absence of residue that might attract dirt, and stability during storage. Each formula underwent extensive testing across different floor types and pet household situations.
Cost analysis revealed surprising savings that extended well beyond the obvious ingredient costs. Reduced veterinary bills from chemical exposure incidents, fewer floor refinishing needs due to gentler cleaning methods, and eliminated costs of specialized “pet-safe” commercial products created substantial long-term savings that justified the initial time investment in developing effective formulas.
Family integration of natural cleaning methods influenced broader household product choices. Success with floor cleaners led to exploring natural alternatives for other cleaning needs – dish soap, laundry detergent, air fresheners, and general surface cleaners. The knowledge gained about ingredient safety and effectiveness transferred to other areas of household management.
Pet behavior observations during the transition provided insights into how cleaning product choices affect animal comfort and behavior. Pets seemed more relaxed in areas cleaned with natural products, showed less paw licking after walking on treated floors, and appeared less stressed during cleaning activities when harsh chemical odors were eliminated.
Sharing knowledge with other pet owners revealed how common these concerns are and how many people struggle with balancing cleanliness and pet safety. The positive feedback from friends and neighbors who tried these formulations validated the effectiveness and reinforced the value of sharing these solutions more broadly.
Long-term perspective on this journey reveals that transitioning to pet-safe cleaning methods represents more than just product substitution – it’s a shift toward more conscious, informed decision-making about the products we bring into our homes. Understanding ingredients, questioning marketing claims, and prioritizing safety over convenience becomes a broader life approach that benefits entire families.
The lessons learned extend far beyond floor cleaning to encompass a more thoughtful approach to pet care and household management. Every product choice becomes an opportunity to prioritize health and safety while maintaining the cleanliness and comfort that makes homes enjoyable for both pets and their families.
This journey continues to evolve as I discover new applications for natural ingredients and refine techniques based on ongoing experience. The foundation established through developing these floor cleaning solutions provides confidence for addressing other household challenges with safe, effective, natural alternatives that protect the pets who depend on us for their health and safety.
Frequently Asked Questions
What ingredients can I use for a pet-safe floor cleaner?
Common pet-safe ingredients for floor cleaners include white vinegar, baking soda, and mild dish soap, as they effectively clean without harsh chemicals. You can mix equal parts water and vinegar for a simple solution that’s non-toxic to pets when used properly. Always ensure the area is well-ventilated and rinse floors thoroughly to avoid residue that pets might lick.
What can I clean my floor with if I have a dog?
For homes with dogs, use natural cleaners like vinegar and water mixtures or enzyme-based products designed for pet messes, which are safe and effective on most floor types. Avoid ammonia-based cleaners as they can mimic urine smells and encourage marking. Test any cleaner in a small area first to ensure it doesn’t damage your flooring.
Is vinegar floor cleaner safe for pets?
Yes, vinegar is generally safe for pets when diluted properly in floor cleaners, as it’s non-toxic and helps neutralize odors without harmful residues. However, undiluted vinegar can irritate pet skin or paws, so always use a mixture of one part vinegar to three parts water. Consult your vet if your pet has sensitivities, and keep them off wet floors until dry.
How do I make an all-purpose DIY floor cleaner safe for pets?
To make a pet-safe all-purpose DIY floor cleaner, combine 1 cup of white vinegar, 1 cup of water, and a few drops of mild dish soap in a spray bottle. Shake well and use on non-porous surfaces, wiping with a microfiber cloth for best results. This mixture cleans effectively while being gentle on pets, but avoid adding essential oils that could be toxic.
What chemicals should I avoid in cleaning products for pet safety?
Avoid chemicals like bleach, ammonia, phenols, and phthalates in cleaning products, as they can cause respiratory issues, skin irritation, or poisoning in pets. Opt for products labeled as pet-safe or those with natural ingredients to minimize risks. Always read labels carefully and store cleaners out of pets’ reach.
How do I clean pet accidents with pet-safe ingredients?
For pet accidents, blot the area with paper towels, then apply a mixture of equal parts vinegar and water to neutralize odors safely. Follow up with baking soda sprinkled on the spot, let it sit, and vacuum it up for thorough cleaning. This method is effective and pet-friendly, preventing re-soiling without harmful chemicals.