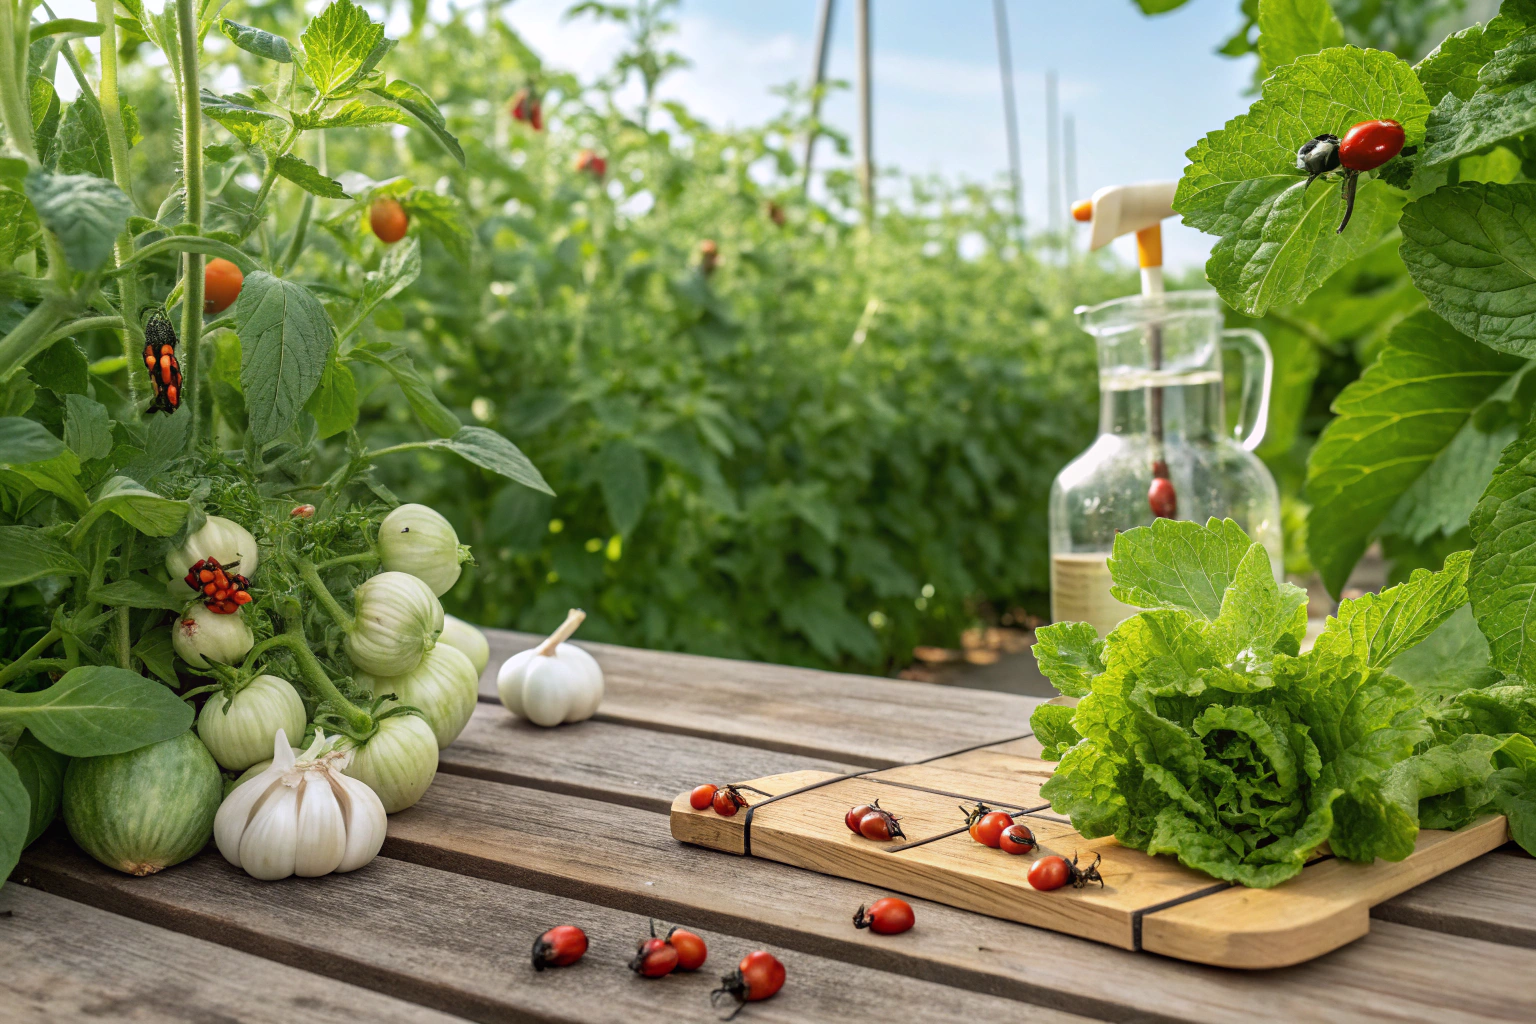
A homemade bug spray for vegetable plants is a do-it-yourself pest control solution made from common, non-toxic household ingredients. These sprays work by either repelling insects with strong scents (like garlic) or disabling them with substances like soap or oil, which disrupt their outer shells. Gardeners often seek these alternatives to avoid applying synthetic pesticides to edible produce, ensuring their harvest is safe to eat while effectively managing pests like aphids, mites, and whiteflies.
Key Benefits at a Glance
- Cost-Effective: Save money by using simple pantry staples like dish soap, vegetable oil, and garlic instead of buying expensive commercial pesticides.
- Safe for Edibles: Protect your health by avoiding harsh synthetic chemicals, ensuring fruits and vegetables are safe to harvest and eat directly from the garden.
- Targets Common Pests: Effectively manage soft-bodied insects such as aphids, spider mites, thrips, and whiteflies that frequently damage vegetable plants.
- Environmentally Friendly: Reduce chemical runoff and plastic waste with biodegradable ingredients that are safer for bees, ladybugs, and other beneficial insects when applied correctly.
- Easy to Prepare and Use: Mix a batch in minutes with simple recipes and apply immediately with a standard spray bottle, offering a quick solution to pest problems.
Purpose of this guide
This guide is for home gardeners who want to protect their vegetable plants from common pests without resorting to commercial chemical sprays. It solves the problem of insect damage on edible crops in a way that is safe, affordable, and sustainable. You will learn how to identify the need for a homemade bug spray, find simple recipes using everyday ingredients, and understand the correct application techniques. By following this advice, you can avoid common mistakes like harming beneficial insects or scorching plant leaves, leading to a healthier garden and a more confident approach to organic pest control.
Why I switched to homemade pest control for my vegetable garden
Three years ago, I stood in my garden holding a bottle of commercial pesticide, watching bees stumble drunkenly away from my freshly sprayed tomato plants. That moment became my tipping point. I realized I was poisoning the very ecosystem I was trying to protect, and worse, potentially contaminating the food my family would eat within weeks.
The transition to chemical-free gardening wasn’t just about avoiding synthetic pesticides. I was concerned about the accumulation of chemical residues on vegetables we’d harvest and consume. Reading labels filled with unpronounceable ingredients made me question what I was really introducing to my soil and plants. The impact on beneficial pollinators became impossible to ignore when I noticed fewer bees visiting my squash blossoms and virtually no butterflies in what used to be a thriving garden ecosystem.
My switch to organic pest control solutions brought unexpected benefits beyond just avoiding chemicals. Within one growing season, I noticed my soil seemed more alive – earthworms returned in greater numbers, and the earth felt richer and more crumbly. Pollinator activity increased dramatically, with native bees and beneficial insects making regular appearances. Most surprisingly, my vegetables actually tasted better. The tomatoes had more complex flavors, and the herbs were more aromatic than ever before.
The financial benefits sealed the deal. My annual pesticide budget dropped from over $200 to less than $30, since most ingredients came from my kitchen pantry. This sustainable gardening approach proved that effective pest control doesn’t require expensive commercial products or harmful chemicals.
Common garden pests and their impact on vegetable plants
Learning to identify garden pests accurately became crucial once I eliminated commercial pesticides from my routine. Early in my gardening journey, I made several embarrassing misidentifications that taught me valuable lessons. I once spent weeks treating what I thought was a fungal disease on my bean plants, only to discover tiny spider mites were the real culprits creating the stippled, yellowing leaves.
Garden pest identification requires close observation of both the insects themselves and their damage patterns. Aphids cluster on new growth and leave behind sticky honeydew that attracts ants. Japanese beetles create a distinctive skeletonized appearance on leaves, eating everything except the major veins. Cucumber beetles leave small, round holes and can cause entire plants to wilt when they attack the stems near soil level.
Understanding pest damage symptoms helps target treatments more effectively. Tomato hornworms strip entire stems bare and leave large, dark droppings that look like rabbit pellets. Cabbage moths lay eggs that hatch into green caterpillars, creating large, irregular holes in brassica leaves. Spider mites cause leaves to develop a stippled, bronzed appearance and may produce fine webbing in severe infestations.
| Pest | Target Plants | Damage Signs | Peak Season |
|---|---|---|---|
| Aphids | Most vegetables | Curled leaves, sticky honeydew | Spring/Early Summer |
| Japanese Beetles | Beans, corn, tomatoes | Skeletonized leaves | Mid-summer |
| Cucumber Beetles | Cucumbers, squash, melons | Holes in leaves, wilting | Early summer |
| Cabbage Moths | Brassicas | Large holes in leaves | Spring/Fall |
| Tomato Hornworms | Tomatoes, peppers | Stripped stems, large droppings | Mid-summer |
| Spider Mites | Beans, tomatoes | Stippled leaves, webbing | Hot, dry weather |
| Whiteflies | Tomatoes, peppers | Yellow leaves, flying insects | Summer |
| Squash Bugs | Squash, pumpkins | Wilting vines, bronze patches | Mid-summer |
| Flea Beetles | Eggplant, potatoes | Small holes in leaves | Early season |
The key to successful insect pests management lies in regular monitoring and quick identification. I learned to inspect my plants weekly, looking for early signs of trouble before infestations become established. This proactive approach makes homemade treatments much more effective than waiting until damage becomes severe.
The 6 most effective ingredients in my DIY bug sprays
After testing dozens of natural insecticide ingredients over several growing seasons, I’ve narrowed down my arsenal to six foundational components that consistently deliver results. This wasn’t a quick process – I experimented with everything from beer traps to banana peels, documenting what worked and what didn’t. Many popular internet remedies proved completely ineffective, while others showed promise but weren’t practical for regular use.
Neem oil and garlic are powerful in both garden and yard sprays—see my Tick Yard Spray for broader use.
The experimental process taught me that effectiveness varies significantly based on pest type, weather conditions, and plant species. What works brilliantly on aphids might be useless against cucumber beetles. I learned to focus on ingredients that offered broad-spectrum control while remaining safe for plants and beneficial insects when used properly.
- Garlic – Natural sulfur compounds repel most garden pests
- Hot peppers – Capsaicin deters chewing insects effectively
- Neem oil – Disrupts insect feeding and reproduction cycles
- Mint – Strong aroma confuses pest navigation systems
- Insecticidal soap – Breaks down soft-bodied insect membranes
- Vegetable oil – Helps ingredients stick to plant surfaces
These six ingredients form the backbone of every effective homemade spray I’ve developed. Most gardeners already have several of these items in their kitchen, making this approach both accessible and economical. The beauty of these organic pest deterrents lies in their versatility – they can be combined in different ratios and concentrations to target specific pest problems.
Safety remains a primary consideration when selecting plant-based insect repellent ingredients. Unlike synthetic pesticides, these natural options break down quickly in the environment and don’t accumulate in plant tissues. However, they still require proper handling and application to avoid plant damage or unintended consequences for beneficial insects.
Essential oils that repel garden pests
My journey with essential oils began out of desperation during a particularly bad aphid outbreak on my pepper plants. Traditional remedies weren’t working fast enough, so I started experimenting with various essential oils for pest control I had collected for other household uses. The results surprised me – certain oils proved remarkably effective against specific pests.
Peppermint oil became my secret weapon against aphids after I noticed them abandoning pepper plants within hours of application. The strong menthol scent seems to overwhelm their sensory systems, making it impossible for them to locate suitable feeding sites. I’ve observed this effect consistently across different plant species and growing seasons.
| Essential Oil | Most Effective Against | Concentration | Cost Level |
|---|---|---|---|
| Peppermint | Aphids, ants | 10-15 drops per cup | Moderate |
| Rosemary | Cabbage moths, beetles | 8-12 drops per cup | Low |
| Thyme | Whiteflies, thrips | 6-10 drops per cup | Moderate |
| Clove | Aphids, spider mites | 5-8 drops per cup | High |
| Citronella | Flying insects | 12-15 drops per cup | Low |
Cost considerations initially made me hesitant about using essential oils regularly. However, I discovered that a small bottle lasts an entire growing season since effective concentrations require only drops, not teaspoons. The key is understanding that these aromatic pest deterrents work through scent disruption rather than direct toxicity, so a little goes a long way.
Rosemary and thyme oils proved particularly valuable because I could harvest these herbs from my own garden and make simple infusions. While not as concentrated as commercial essential oils, homemade herbal extracts still provide significant natural insect repellent properties at virtually no cost.
Kitchen staples that combat garden insects
The discovery that common kitchen ingredients could effectively control garden pests happened by accident during a severe aphid outbreak on my cucumber plants. I had run out of commercial spray and needed an immediate solution. Remembering something about garlic repelling insects, I crushed several cloves, mixed them with water, and sprayed the affected plants. Within 24 hours, the aphid population had dropped dramatically.
This success launched my exploration of kitchen ingredients pest control methods. I systematically tested items from my pantry, documenting results and refining techniques. Garlic consistently proved most effective, but combinations of ingredients often worked better than single components.
- Garlic cloves – Crush fresh for maximum potency
- Cayenne pepper – Use 1-2 teaspoons per quart of water
- White vinegar – Effective against soft-bodied pests
- Cinnamon – Natural fungicide and ant deterrent
- Coffee grounds – Sprinkle around plants to deter slugs
- Baking soda – Mix with oil for powdery mildew control
The cucumber plant rescue became a turning point in my approach to pest management. Those plants not only recovered completely but went on to produce my best cucumber harvest ever. This experience proved that homemade solutions could be just as effective as commercial products while being safer for my family and the environment.
Experimentation revealed that timing and preparation methods significantly impact effectiveness. Fresh garlic works better than powdered, and crushing releases more active compounds than simply chopping. Hot peppers need steeping time to extract maximum capsaicin, while vinegar solutions work best when applied during cooler parts of the day to avoid leaf burn.
My top 4 homemade bug spray recipes for vegetable plants
These four recipes represent the culmination of years of testing, refinement, and real-world application across different climates and growing conditions. I’ve moved from Minnesota’s short growing season to Georgia’s humid summers, and these DIY insecticide recipes have proven effective in both environments. Each recipe targets different pest categories while remaining safe for edible plants.
My testing methodology evolved from trial and error to systematic evaluation. I always test new spray recipes on small sections of plants first, waiting 24-48 hours to observe any adverse reactions before broader application. This approach has saved me from several potential disasters, including one near-miss where an untested concentration nearly burned my pepper plants.
- Always test spray on small plant section first
- Use clean containers and label with ingredients and date
- Make fresh batches every 2-4 weeks for maximum potency
- Store in cool, dark places away from direct sunlight
- Shake well before each application
- Clean spray equipment thoroughly after each use
Storage and preparation consistency make the difference between effective homemade garden spray formulations and disappointing results. I learned this lesson when a batch of garlic spray stored in direct sunlight lost its potency within days. Now I treat these natural ingredients with the same care I would commercial products, understanding that proper handling ensures consistent results.
All purpose garlic mint spray my go to solution
This recipe has been my most reliable pest control solution for over five years. I developed it after combining the aphid-fighting power of garlic with mint’s broad-spectrum repellent properties. The combination creates a spray that works against most common garden pests while being gentle enough for daily use on food crops.
The preparation process requires patience but produces consistently effective results. I crush a full head of garlic and let it sit for ten minutes, allowing the allicin compounds to fully develop. This step is crucial – skipping the waiting period significantly reduces the spray’s effectiveness. Adding fresh mint leaves and blending creates a potent mixture that pests find overwhelming.
- Crush one full head of garlic and let sit 10 minutes
- Add 2 cups fresh mint leaves to crushed garlic
- Blend with 2 cups water for 30 seconds
- Strain mixture through fine mesh or cheesecloth
- Add 1 tablespoon castile soap to strained liquid
- Dilute with water to make 1 quart total volume
- Apply early morning when pests are less active
My most memorable success with this garlic spray came during an early-season aphid invasion that threatened to destroy my tomato seedlings. Within three days of twice-daily applications, the aphid population dropped to manageable levels, and the plants recovered completely. This experience convinced me that natural pest control could handle even serious infestations when applied consistently.
Early morning application became my standard practice after learning that pests are less active during cooler temperatures, making the spray more effective. The combination of timing and this mint spray formulation consistently delivers results that rival any commercial product I’ve used.
Hot pepper spray for tough pest problems
When gentle solutions fail, this hot pepper spray serves as my heavy artillery against persistent pest problems. I reserve this stronger formulation for serious infestations or particularly stubborn pests that don’t respond to milder treatments. The recipe combines the deterrent power of cayenne pepper with fresh hot peppers for maximum effectiveness.
My first attempt at making this spray taught me a painful lesson about proper safety precautions. I didn’t wear gloves during preparation and spent the next several hours with burning hands that no amount of soap could relieve. Now I treat hot pepper preparation with the same caution I’d use for any potent substance, wearing gloves and working in well-ventilated areas.
- Always wear gloves when handling hot peppers
- Avoid touching face or eyes during preparation
- Work in well-ventilated area to avoid inhaling vapors
- Keep spray away from children and pets
- Test on small plant area first – can burn sensitive leaves
- Most effective against: Squash bugs, cucumber beetles
- Also controls: Tomato hornworms, cabbage worms
- Best for: Serious infestations of chewing insects
- Application: Every 5-7 days until pest pressure reduces
The recipe involves boiling water with cayenne pepper and chopped hot peppers, then steeping overnight to extract maximum capsaicin. This caterpillar deterrent works by making plants taste unbearably spicy to chewing insects. I’ve watched tomato hornworms abandon plants immediately after tasting leaves treated with this spray.
This spicy insect deterrent requires careful application timing and plant selection. Sensitive plants like lettuce or young seedlings can suffer leaf burn from the concentrated capsaicin. I learned to reserve this treatment for established plants with tougher foliage that can handle the intensity.
Neem oil mixture for fungal and pest control
Discovering neem oil’s dual-purpose capabilities happened during a frustrating battle with simultaneous powdery mildew and aphids on my squash plants. Traditional treatments required separate applications for each problem, but neem oil addressed both issues with a single spray. This multi-purpose garden spray quickly became essential for comprehensive plant protection.
The critical factor with neem oil is proper emulsification – mixing oil and water requires an emulsifier to create a stable solution. Most failures with neem oil stem from inadequate mixing, resulting in separated solutions that don’t distribute evenly on plant surfaces. I learned to use warm water and constant stirring to create proper emulsification.
- Warm 1 cup water to room temperature
- Add 1 teaspoon castile soap and mix thoroughly
- Slowly add 1 tablespoon neem oil while stirring constantly
- Continue stirring for 2-3 minutes until well emulsified
- Add mixture to spray bottle with remaining water
- Shake vigorously before each spray application
- Apply in evening to avoid beneficial insect contact
Neem oil works best as a preventative measure rather than a cure for advanced problems. I’ve observed that regular applications during the growing season prevent many pest and fungal issues from becoming established. However, once problems reach severe levels, neem oil alone may not provide sufficient control.
This fungal control spray requires evening application to protect beneficial insects. Neem oil can harm bees and other pollinators if they contact treated surfaces while the spray is wet. By applying in the evening, I ensure the spray dries before beneficial insects become active the following morning.
Soap based spray for soft bodied insects
This simple soap solution was actually my first successful homemade spray, and it remains one of my most reliable tools against specific pest categories. The recipe targets soft-bodied insects by disrupting their cell membranes and protective waxy coatings. I’ve found it particularly effective against aphids, whiteflies, and spider mites that plague many vegetable crops.
The key to success lies in soap selection and concentration. I initially used regular dish soap, which worked but sometimes damaged sensitive plants. Switching to castile soap provided gentler action while maintaining effectiveness. The soap concentration must be strong enough to affect pests without harming plant tissues.
| Soap Type | Effectiveness | Plant Safety | Best Use |
|---|---|---|---|
| Castile soap | High | Very safe | All vegetables, daily use |
| Dawn dish soap | Very high | Moderate risk | Emergency treatments only |
| Insecticidal soap | High | Safe | Commercial alternative |
- Most effective on: Aphids, whiteflies, spider mites, mealybugs
- Sensitive plants: Young seedlings, hairy-leaved plants
- Application rate: 1-2 tablespoons per quart of water
- Frequency: Every 3-5 days until pests are controlled
Understanding the mode of action helps explain why this insecticidal soap works only on certain pests. Hard-bodied insects like beetles remain unaffected because their exoskeletons provide protection. However, soft-bodied insect control becomes remarkably effective when the soap solution contacts target pests directly.
Plant sensitivity varies significantly, and I’ve learned to identify which vegetables require extra caution with soap solution applications. Young seedlings and plants with fuzzy leaves like squash can show damage from concentrations that don’t affect smooth-leaved plants like peppers or tomatoes.
Case studies before and after results from my garden
Three specific examples from my garden demonstrate the real-world effectiveness of homemade pest control solutions. Each case study includes detailed documentation of the problem, treatment approach, and measurable results. These aren’t theoretical successes – they represent actual pest crises that threatened significant crop losses.
The first case involved nearly dead basil plants suffering from severe aphid infestation. The plants had yellowed, curled leaves and were covered in sticky honeydew. I applied garlic-mint spray twice daily for four days, documenting the progress with photographs. By day six, new growth appeared, and within two weeks, the plants had recovered completely and produced abundant harvests.
My tomato hornworm invasion provided the most dramatic before-and-after transformation. I discovered three large hornworms that had stripped entire branches bare on my prize tomato plants. Hot pepper spray applications every other day for one week eliminated the hornworms and prevented further damage. The plants recovered and went on to produce my best tomato harvest ever.
The third case study involved spider mites on bean plants during a particularly hot, dry summer. The leaves showed the characteristic stippling and bronze coloration of heavy mite damage. Soap-based spray applications every three days for two weeks gradually reduced the mite population and allowed the plants to recover their green color and resume normal growth.
Each case study reinforced important lessons about timing, persistence, and appropriate treatment selection. Early intervention consistently produced better results than waiting until problems became severe. Regular monitoring allowed me to catch problems while they remained manageable rather than after they threatened entire crops.
Application tips how I apply for maximum effectiveness
Proper application technique makes the difference between successful pest control and disappointing results. Over years of refinement, I’ve developed a systematic approach that maximizes spray effectiveness while minimizing plant stress. The process begins with thorough plant inspection and ends with careful monitoring of results.
Timing applications for optimal effectiveness requires understanding both pest behavior and plant physiology. Early morning applications between 6-8 AM take advantage of cooler temperatures and higher humidity, which help sprays adhere to plant surfaces. Evening applications work equally well and avoid potential leaf burn from intense sunlight hitting wet foliage.
- Inspect plants thoroughly for pest presence and damage
- Choose early morning (6-8 AM) or evening (6-8 PM) application
- Shake spray bottle vigorously before use
- Spray all plant surfaces including undersides of leaves
- Focus extra attention on growing tips and flower buds
- Allow plants to dry completely before watering
- Monitor results and reapply every 3-7 days as needed
- Clean spray equipment after each use
Complete coverage requires attention to areas where pests typically hide or feed. Many gardeners make the mistake of only spraying visible plant surfaces, missing the undersides of leaves where aphids, spider mites, and whiteflies commonly congregate. I learned to lift leaves and spray from multiple angles to ensure thorough coverage.
The monitoring phase proves just as important as the application itself. I check treated plants daily for the first week, looking for signs of pest reduction and any adverse plant reactions. This careful observation allows me to adjust treatment frequency and concentration based on actual results rather than arbitrary schedules.
Seasonal application schedule
Developing an effective seasonal spray schedule required years of observation and adjustment based on pest patterns in my specific location. The approach varies dramatically from early spring preventative treatments to intensive summer pest management, with each season requiring different strategies and application frequencies.
Spring applications focus on preventing pest establishment before problems become visible. I begin light preventative spraying in early April, targeting areas where overwintering pests typically emerge. This proactive approach consistently reduces pest pressure throughout the growing season compared to reactive treatments.
| Season | Application Frequency | Primary Focus | Key Pests |
|---|---|---|---|
| Early Spring | Weekly preventative | Soil preparation, young plants | Aphids, flea beetles |
| Late Spring | Bi-weekly maintenance | Established plants | Cucumber beetles, cabbage moths |
| Summer | Every 3-5 days | Peak pest activity | All major pests |
| Early Fall | Weekly monitoring | Harvest protection | Stink bugs, late-season aphids |
| Late Fall | As needed | Clean-up applications | Overwintering pests |
Summer represents the most intensive period for pest management, requiring frequent applications and careful monitoring. Hot, humid weather creates ideal conditions for rapid pest reproduction, making consistent treatment essential. I’ve learned to anticipate pest outbreaks based on weather patterns – extended periods of hot, dry weather typically trigger spider mite problems, while warm, humid conditions favor aphid population explosions.
Weather pattern recognition helps me shift from reactive to proactive pest management. Watching extended forecasts allows me to increase spray frequency before pest populations explode rather than scrambling to control established infestations. This approach consistently produces better results with less overall spray usage.
Companion planting for enhanced pest control
Strategic companion planting creates a synergistic relationship with homemade sprays, providing multiple layers of pest protection that work better together than either approach alone. My experiments with plant combinations revealed specific partnerships that significantly reduce pest pressure while supporting beneficial insect populations.
Add mosquito-repelling plants like citronella (safe varieties) from my Mosquito Repellent Guide.
The most successful combination in my garden pairs basil with pepper plants. After adding basil companions to my pepper beds, I noticed a dramatic reduction in aphid populations even before applying any sprays. The basil seems to confuse aphids’ ability to locate pepper plants, while its strong aroma enhances the effectiveness of garlic-mint spray applications.
| Vegetable | Companion Plant | Pest Deterred | Additional Benefit |
|---|---|---|---|
| Tomatoes | Marigolds | Nematodes, aphids | Attracts beneficial insects |
| Cucumbers | Nasturtiums | Cucumber beetles | Trap crop for aphids |
| Peppers | Basil | Aphids, thrips | Improves pepper flavor |
| Cabbage | Dill | Cabbage worms | Attracts parasitic wasps |
| Beans | Catnip | Flea beetles | Repels mosquitoes too |
Marigolds around tomato plants provide both pest deterrence and beneficial insect habitat. The flowers attract parasitic wasps and other predatory insects that help control pest populations naturally. When combined with regular neem oil applications, this partnership creates a robust defense system that requires fewer spray interventions overall.
Nasturtiums serve as excellent trap crops, drawing cucumber beetles and aphids away from valuable vegetable plants. I plant nasturtiums at the edges of cucumber beds, then focus spray treatments on these sacrificial plants rather than treating the entire crop. This targeted approach reduces spray usage while maintaining effective pest control.
Common mistakes to avoid lessons from my garden
Learning effective homemade pest control required making numerous mistakes and learning from their consequences. These errors taught valuable lessons that improved my success rate and helped me avoid plant damage from improper application techniques. Sharing these mistakes helps other gardeners skip the learning curve I experienced.
My most painful lesson involved spraying during midday heat, which caused severe leaf burn on pepper plants. The combination of wet foliage and intense sunlight created a magnifying effect that damaged leaves worse than the original pest problem. This experience taught me to respect application timing and weather conditions as much as spray formulation.
- Never spray during midday heat – causes leaf burn
- Don’t skip the straining step – clogs spray equipment
- Avoid using dish soap with degreasers on plants
- Don’t apply the same spray daily – can stress plants
- Never mix different spray recipes together
- Don’t forget to test new recipes on small areas first
Equipment maintenance mistakes caused several frustrating setbacks. I learned the hard way that failing to strain garlic mixtures properly leads to clogged spray nozzles and uneven application. Cleaning spray equipment thoroughly after each use prevents residue buildup that reduces effectiveness and potentially damages sensitive plant tissues.
- DO shake mixtures before every application
- DON’T store mixed sprays longer than 4 weeks
- DO clean spray equipment after each use
- DON’T spray beneficial insects directly
- DO apply during calm weather conditions
- DON’T increase concentration thinking it works better
Concentration mistakes taught me that more isn’t always better with natural ingredients. Doubling garlic concentration didn’t improve pest control but did cause plant stress and leaf yellowing. Natural ingredients require balance – effective concentrations provide pest control without overwhelming plant systems or beneficial microorganisms.
Mechanical and physical barriers as complementary protection
Combining homemade sprays with physical barriers creates a comprehensive pest management system that addresses multiple attack vectors simultaneously. This integrated approach proved more effective than relying solely on sprays, especially for protecting young plants during their most vulnerable growth stages.
Row covers provide excellent protection for young cabbage plants against flea beetles and cabbage moths. I use floating row covers during the first month after transplanting, then remove them and transition to regular garlic-mint spray applications. This combination gives plants time to establish strong root systems before facing pest pressure.
My most creative physical barrier solution involved making cutworm collars from yogurt containers. After losing several young tomato plants to cutworm damage, I cut 3-inch sections from plastic containers and placed them around transplants at soil level. Combined with hot pepper spray applications, this barrier system eliminated cutworm losses completely.
| Barrier Type | Best For | When to Use | Combines With |
|---|---|---|---|
| Row covers | Young plants, flying pests | Early season protection | All spray types |
| Sticky traps | Flying insects | Monitoring and control | Soap and neem sprays |
| Diatomaceous earth | Crawling insects | Dry weather periods | Garlic-mint spray |
| Plant collars | Cutworms, stem borers | Transplant time | Hot pepper spray |
| Copper tape | Slugs and snails | Wet season protection | All spray recipes |
Sticky traps serve dual purposes as monitoring tools and pest control devices. Yellow sticky traps placed throughout the garden help me track pest population changes and identify emerging problems before they become serious. When combined with targeted spray applications, traps provide early warning systems that improve treatment timing.
Diatomaceous earth works exceptionally well with spray treatments during dry weather periods. I apply food-grade diatomaceous earth around plant bases, then follow with garlic-mint spray applications to create multiple barriers against crawling insects. This combination provides sustained protection even when rain washes away spray residues.
Frequently Asked Questions
What can you put on vegetable plants to keep bugs away?
You can apply natural repellents like garlic-mint sprays, neem oil, or soap solutions to vegetable plants to keep bugs away. These options are effective for deterring common pests without harming the plants when used properly. Always test a small area first and rinse edibles thoroughly before consumption.
How do you make natural insect spray with garlic and mint?
To make a natural insect spray, blend several garlic cloves and a handful of fresh mint leaves with water, then strain the mixture into a spray bottle. Add a teaspoon of mild dish soap to help the spray adhere to leaves. Shake well before applying to vegetable plants for best results.
Is homemade bug spray safe for edible vegetable plants?
Yes, homemade bug spray from natural ingredients like garlic and mint is generally safe for edible vegetable plants, as it avoids harsh chemicals. It can be applied directly but should be washed off vegetables before eating. This makes it a preferable option for organic gardening.
How often should you apply homemade insect spray to plants?
Apply homemade insect spray every 5-7 days or after heavy rain to maintain effectiveness on vegetable plants. Monitor for pest activity and reapply as needed, especially during peak growing seasons. Over-application should be avoided to prevent any potential residue buildup.
What are the advantages of homemade bug sprays over commercial products?
Homemade bug sprays are cost-effective, customizable, and made from natural ingredients, reducing environmental impact compared to commercial products. They often avoid synthetic chemicals that can harm beneficial insects or soil health. Additionally, you control the ingredients for safer use on edible plants.