Not gonna lie! Minutes!
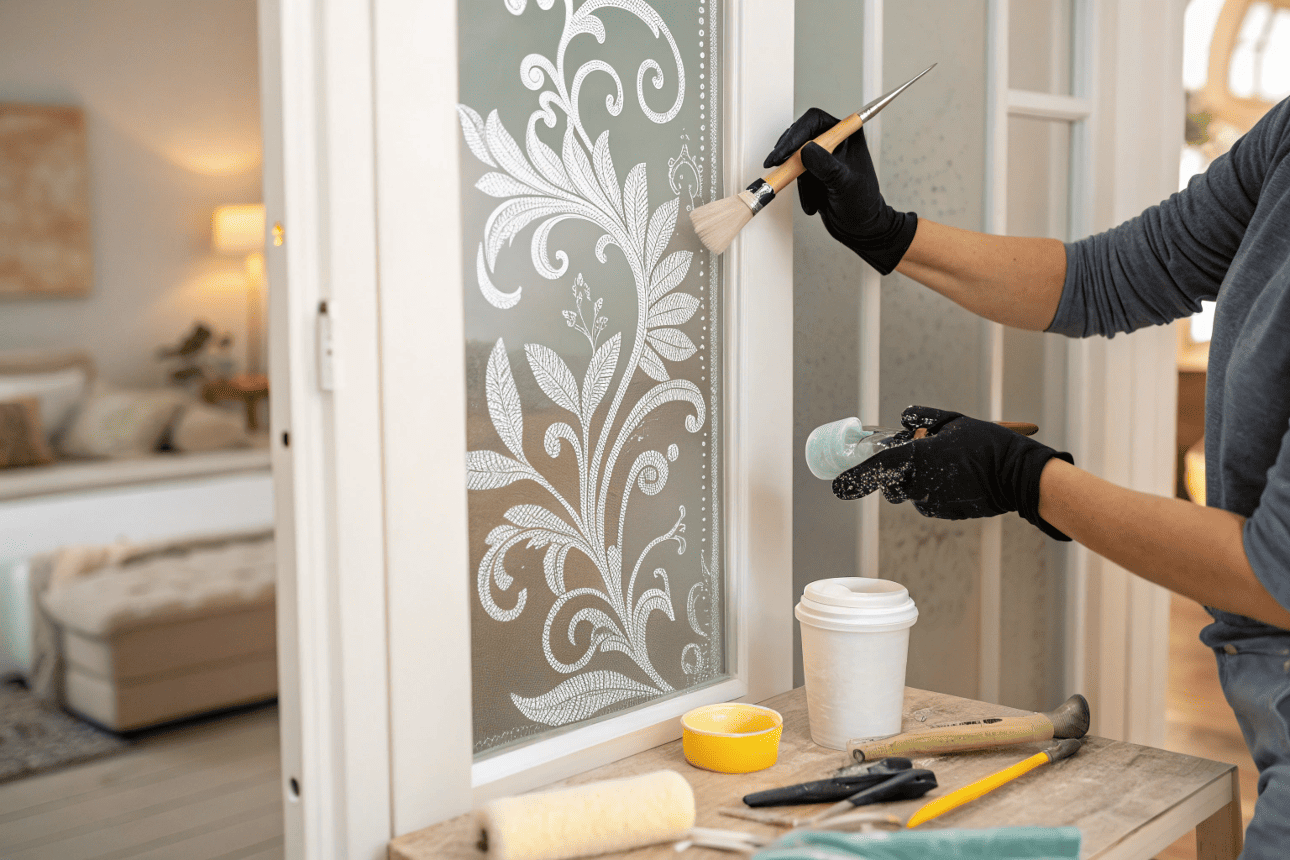
Create some privacy in your home by DIY etching your entry windows.
Looking for a way to add privacy to your windows without sacrificing natural light? Glass etching is a fast and stylish solution that you can do yourself in under 30 minutes. This method is ideal for sidelights, entry windows, and other exposed glass areas where privacy matters — without the need for curtains or blinds.
How to Etch Your Glass in Minutes: My Foolproof Technique After 100+ Projects
Key Takeaways:
- Complete glass etching in under 10 minutes with proper technique
- Transform ordinary glass into custom gifts and decorations
- Master professional-looking results using affordable supplies
- Learn troubleshooting tips to avoid common mistakes
Glass etching seems intimidating, but after completing over 100 projects, I’ve perfected a foolproof technique that delivers professional results in minutes. What started as a curiosity about personalizing wine glasses has evolved into my go-to craft for creating meaningful gifts and home décor.
The beauty of glass etching lies in its simplicity—with just a few supplies and the right technique, anyone can transform plain glass into stunning custom pieces that look professionally made.
Why Glass Etching Is the Perfect DIY Craft
Glass etching offers unmatched versatility for creating personalized items. Unlike temporary decorations, etched designs are permanent and dishwasher-safe, making them practical for everyday use. The process requires minimal investment but yields impressive results that rival expensive custom glassware.
I’ve created everything from wedding gifts to holiday decorations, and the recipient’s reaction is always the same—amazement that something so beautiful was handmade. The durability of etched glass means these pieces become treasured keepsakes rather than disposable crafts.
Items you can etch:
- Drinking glasses and wine glasses
- Vases and decorative bowls
- Picture frames and mirrors
- Glass doors and windows
- Bottles and jars
- Shower doors and bathroom mirrors
Essential Supplies: What You’ll Need for Success
After testing numerous brands and materials, I’ve narrowed down the essential supplies that guarantee success. The initial investment is modest—under $30 for enough supplies to complete multiple projects.
Essential Supply List:
- Etching cream (Armour Etch recommended – $8-12)
- Vinyl stencils or contact paper ($5-10)
- Foam brushes or old paintbrushes ($3-5)
- Rubber gloves (nitrile preferred – $5)
- Safety glasses ($3-5)
- Craft knife and cutting mat ($10-15)
- Transfer paper (optional but helpful – $5)
Etching Cream BrandPrice RangeProsConsArmour Etch$8-12Reliable, widely availableSlower workingEtch All$10-15Fast-acting, smooth finishHarder to findGlass Etch$6-10Budget-friendlyInconsistent results
Understanding Etching Cream: Safety and Selection
Etching cream contains hydrofluoric acid, which permanently etches glass by dissolving the surface layer. Armour Etch remains my preferred choice after years of testing—it provides consistent results and is readily available at most craft stores.
Critical Safety Precautions:
- Always wear gloves and safety glasses
- Work in ventilated areas
- Keep cream away from children and pets
- Never mix with other chemicals
- Store in original container only
⚠️ Warning: Etching cream can cause severe burns. If contact occurs with skin, rinse immediately with cold water for 15 minutes and seek medical attention.
Store etching cream in a cool, dry place away from direct sunlight. Properly stored cream maintains effectiveness for 2-3 years.
Stencil Options: Vinyl, Pre-Made, and DIY
Stencil quality directly impacts your final results. I’ve experimented with various materials and consistently achieve the best results with adhesive vinyl designed for crafting.
Stencil Comparison:
- Adhesive vinyl (Oracal 651): Best adhesion, clean edges, reusable
- Contact paper: Budget option, acceptable for simple designs
- Pre-made stencils: Convenient but limited design options
- Hand-cut stencils: Time-intensive but allows complete customization
For beginners, I recommend starting with simple geometric designs or letters. As skills develop, intricate patterns become manageable.
Getting Started: Preparation Steps
Proper preparation prevents 90% of etching problems. I’ve learned this through countless projects where rushing the prep work resulted in disappointing results.
Preparation Steps:
- Clean glass thoroughly with rubbing alcohol
- Dry completely with lint-free cloth
- Plan design placement before applying stencil
- Ensure workspace ventilation
- Gather all supplies within reach
Pro Tip: Oil from fingerprints prevents proper etching. Clean glass immediately before applying stencils, even if it looks clean.
Choosing the Right Glass
Not all glass etches equally. Thicker glass (like drinking glasses) produces better results than thin glass (like light bulbs). Avoid tempered glass, as it may shatter during etching.
Best Glass Types for Etching:
- Regular drinking glasses
- Picture frames
- Vases and bowls
- Window glass
- Mirror glass
Glass Difficulty Ratings:
Glass TypeDifficultyNotesDrinking glassesEasyThick, stable surfaceWine glassesMediumCurved surfaces require careBottlesMediumCurved, requires steady handMirrorsEasyFlat surface, dramatic resultsTempered glassAvoidMay shatter or crack
Thrift stores and dollar stores offer excellent practice glass at minimal cost. I’ve found some of my best pieces at garage sales.
Creating and Applying Your Stencil
Stencil application determines edge quality. Take time to smooth out air bubbles and ensure complete adhesion along edges.
Stencil Application Process:
- Position stencil without removing backing
- Mark placement with removable tape
- Remove backing from one corner
- Smooth gradually while removing backing
- Press edges firmly with craft knife handle
- Remove air bubbles by pricking and smoothing
For curved surfaces, use a heat gun or hair dryer to warm the vinyl, making it more pliable.
The Etching Process: Step-by-Step Guide
The actual etching takes only 5-15 minutes, depending on the cream strength and desired depth. I’ve found that consistent, thick application produces the most uniform results.
Etching Process:
- Apply etching cream in thick, even layer
- Cover entire stencil opening completely
- Wait 5-15 minutes (follow cream instructions)
- Rinse thoroughly with cold water
- Remove stencil while glass is wet
- Clean final residue with soap and water
The cream should be thick enough that you can’t see through it to the glass beneath. Thin application results in uneven etching.
Applying the Etching Cream Properly
Cream thickness makes the difference between amateur and professional results. Apply cream like you’re frosting a cake—thick and even coverage is essential.
Application Technique:
- Use foam brush for large areas
- Apply in overlapping strokes
- Maintain consistent thickness throughout
- Don’t scrub or brush repeatedly over same area
What to Avoid:
- Thin, streaky application
- Brushing cream around excessively
- Letting cream dry before rinsing
- Applying cream beyond stencil edges
Timing and Monitoring the Etching Process
Different brands require different timing. Start with shorter times and increase as needed for deeper etching.
Typical Etching Times:
Cream TypeLight EtchMedium EtchDeep EtchArmour Etch5 minutes10 minutes15 minutesEtch All3 minutes6 minutes10 minutesGlass Etch8 minutes15 minutes20 minutes
You can peek under the cream to check progress, but avoid disturbing the application. The glass will appear cloudy white when properly etched.
Finishing Touches and Care Instructions
Proper cleanup and stencil removal preserve the crisp edges you’ve worked to achieve. Remove stencils while the glass is still wet for easiest removal.
Finishing Steps:
- Rinse cream thoroughly with cold water
- Remove stencil starting from one corner
- Clean with dish soap to remove residue
- Dry with soft cloth
- Inspect for missed spots
Care Instructions for Etched Glass:
- Dishwasher safe on normal cycle
- Avoid abrasive cleaners
- Clean with soft cloths only
- Store carefully to prevent scratching
Creative Ideas and Applications
Glass etching opens endless possibilities for personalization. I’ve created everything from wedding party gifts to seasonal decorations, and each project offers new creative opportunities.
Project Ideas by Occasion:
- Weddings: Champagne flutes with names and dates
- Holidays: Ornament glasses with festive designs
- Housewarming: Address numbers on glass panels
- Birthdays: Wine glasses with age milestones
- Corporate: Logo glasses for business gifts
Difficulty and Time Estimates:
Project TypeDifficultyTimeSimple textBeginner10 minutesGeometric patternsIntermediate20 minutesDetailed graphicsAdvanced45 minutesMulti-layer designsExpert1+ hour
Personalization Ideas for Special Occasions
The most meaningful etched pieces incorporate personal elements. Monograms, dates, and custom messages transform ordinary glass into treasured keepsakes.
Wedding Design Ideas:
- Bride and groom names with wedding date
- “Mr. & Mrs.” with last name
- Wedding party roles on individual glasses
- Table numbers for reception
Holiday Inspiration:
- Snowflakes for winter celebrations
- Pumpkins for autumn décor
- Hearts for Valentine’s Day
- Shamrocks for St. Patrick’s Day
Combining Glass Etching with Other Techniques
Etched areas accept paint beautifully, allowing for colorful designs. I’ve had success with glass paint applied after etching for vibrant results.
Enhancement Techniques:
- Glass paint: Apply after etching for colored designs
- Glitter: Add to wet paint for sparkle effects
- Metallic leaf: Adheres well to etched surfaces
- Vinyl decals: Combine with etching for mixed media looks
Always let etched glass cure for 24 hours before applying additional materials.
Troubleshooting Common Issues
Even experienced crafters encounter problems. Here are solutions to the most common etching issues I’ve faced.
Common Problems and Solutions:
ProblemCauseSolutionBlotchy etchingUneven cream applicationApply thicker, more even layerCream leakagePoor stencil adhesionPress edges firmly, use vinylWeak etchingOld cream or short timeUse fresh cream, extend timeResidue remainsIncomplete rinsingRinse longer with cold water
Preventing and Fixing Etching Cream Leaks
Cream leakage under stencils creates unwanted etched areas. Prevention is easier than repair, but salvage is possible.
Prevention Techniques:
- Use high-quality adhesive vinyl
- Press all edges firmly with craft knife
- Test stencil adhesion before applying cream
- Avoid overly intricate designs as a beginner
Emergency Fixes:
- Wipe leaked cream immediately with damp cloth
- Use fine-grit sandpaper on minor leaked areas
- Apply additional decorative elements to disguise mistakes
Addressing Uneven or Blotchy Etching
Inconsistent etching usually results from uneven cream application or poor surface preparation. Environmental factors like humidity can also affect results.
Achieving Even Results:
- Apply cream in consistent thickness
- Maintain steady room temperature
- Use foam brush for smooth application
- Allow cream to work without disturbing
For rescue attempts, additional etching cream applications can sometimes even out blotchy areas.
FAQ
What’s the minimum project time?
Simple designs can be completed in 10-15 minutes, including prep and cleanup time.
Can I reuse stencils?
Vinyl stencils can be reused 3-5 times if carefully removed and stored flat. Clean any cream residue before storage.
Is glass etching dishwasher safe?
Etched glass is dishwasher safe on normal cycles. Avoid heated dry settings and abrasive detergents.
Can I etch drinking glasses safely?
Yes, etched drinking glasses are food-safe once properly cleaned. The etching doesn’t affect the glass’s safety for beverages.
How long does etching cream last?
Properly stored etching cream remains effective for 2-3 years. Replace if it becomes thick or doesn’t etch properly.